Week 1 - Introduction to Unity
In my first week for CGI foundations I got introduced to Unity. It is a cross-platform game engine that many triple A studios use to develop their games, notorious games that are developed using unity are Rust and Kerbal Space Program.

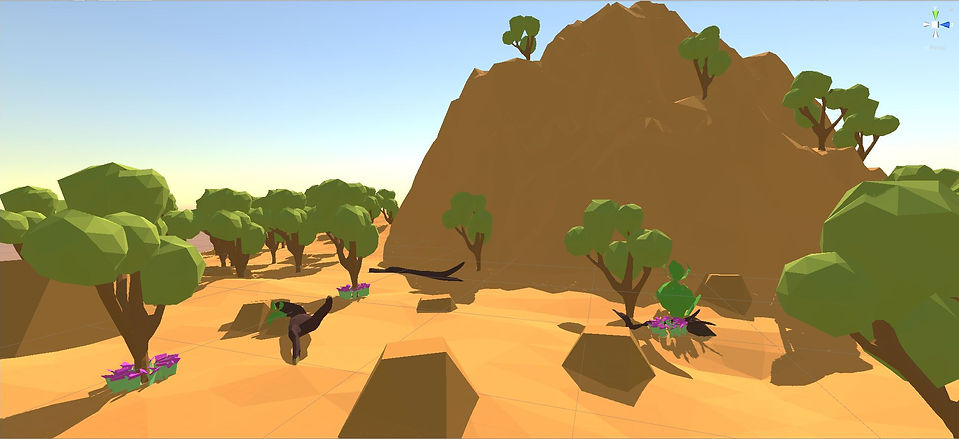
Above I have imported a free asset from the Unity asset store, in which the asset pack comes with lots of different low poly trees, rocks and flowers. The screenshot above is a demo scene that someone have compiled together but below is a scene that I have made myself.
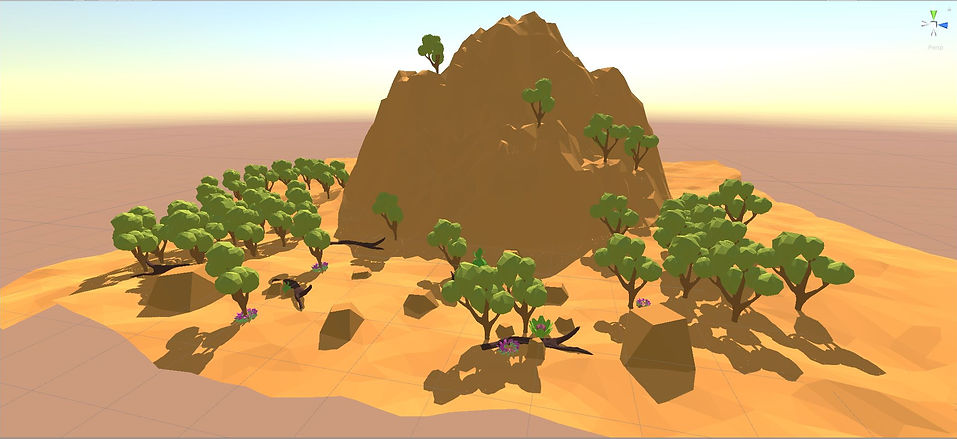
In the scene that I made myself above and below I used all the desert looking assets to make a sort of desert.
I also experimented with the Unity standard assets pack which includes a FPS camera angle, below is a video of the FPS camera in action.
Week 2 - Maya scene organisation, sculpting and displacement
This week in CGI foundations I was taught more about how to use Maya better and with more ease by learning grouping and hierarchies, instances and duplicates and also displaying layers/ displaying attributes just to name a few.

Grouping and the hierarchy
I also learnt about sculpting using Maya and when to use all the different brushes. Below is an example using the basic sculpt brush:
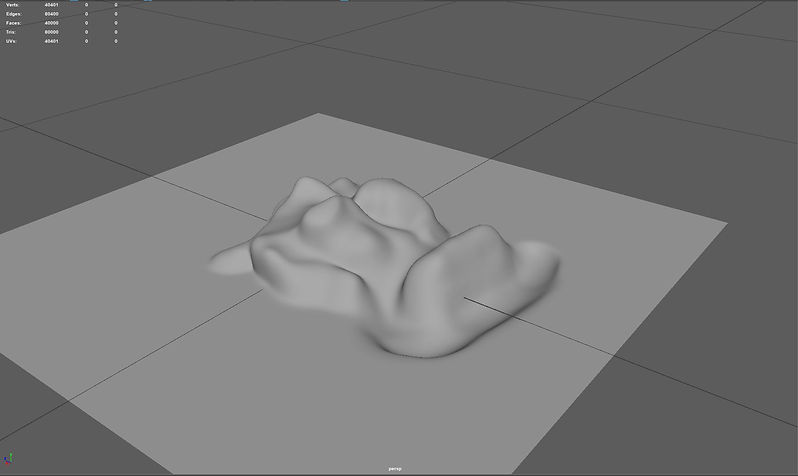
Maya sculpt
Furthering on from what I learnt about sculpting in Maya I was also taught that I can use a displacement map to help sculpt landscape like a mountain. I placed the image into the stamp area which projects the displacement map when I sculpt
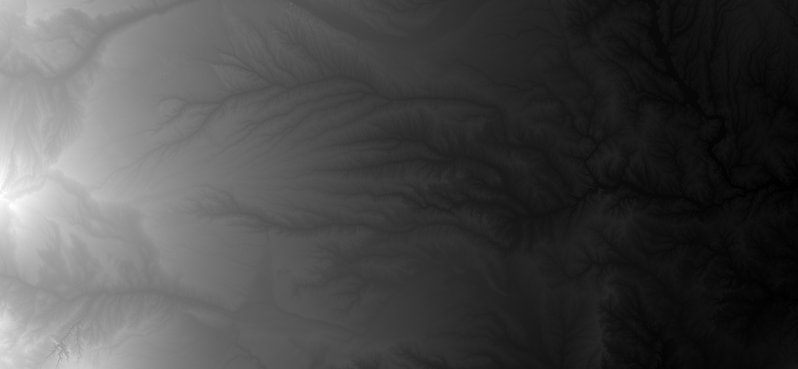
Displacement map

Sculpt using stamp
Week 3: Environment Modeling and Texturing
This week in CGI foundations I was taught about how to create and also texture leaves in Maya by using alpha channel textures. I was also shown how you can tree model in Maya by using the different polygon sculpting tools. Below is my plant that I have made using leaf alphas.

Bush made using leaf alphas
I was also shown how you can make the tree alphas much more realistic by adding displacement to it as seen below:

Leaf made using displacement maps

Hyper shade view of displacement
Week 4: Lighting
This week in CGI foundations I learnt about lighting inside Maya. I have learnt about most lighting in Maya in a previous module but this time I was taught more about the different settings that you can apply when using the different lighting methods.
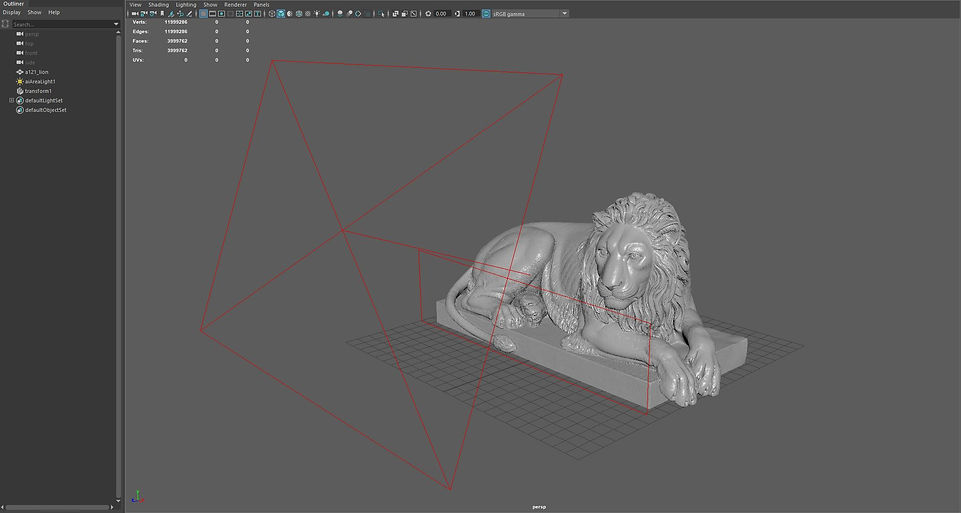
Scene View of Lion and Lighting
Above I have imported a lion asset in which I added an area light and then scaled it and moved in place in which I then changed the spread settings to allow more light to hit the lion whilst also adding a light blocker on the lower area of the statue that stops a certain amount of light from hitting to lion. Below is the rendered result.

Rendered Lion
I also had a look at a scene that had a light setup for real time rendering in Viewport 2.0. Below is the scene that I had a look at:
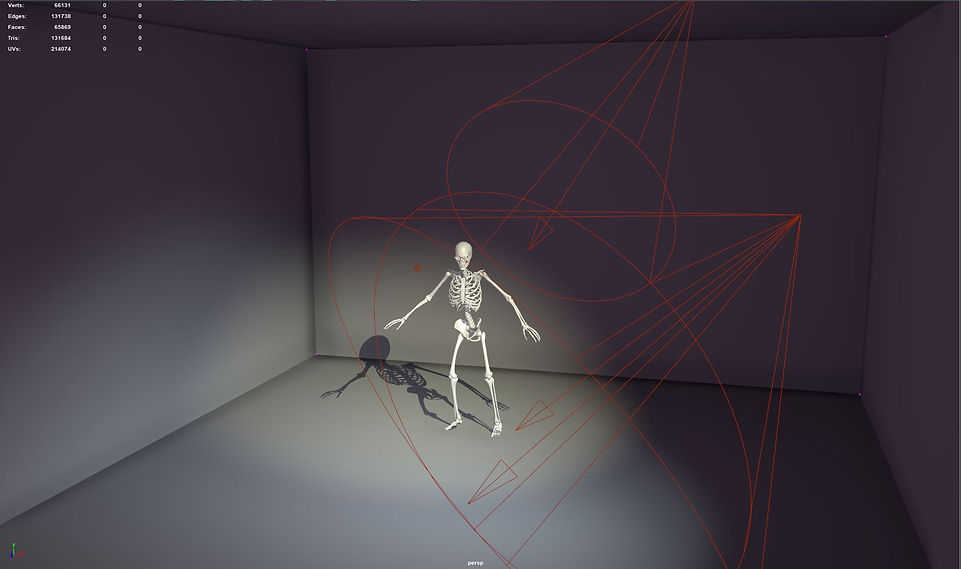
Rendering real time in Viewport 2.0
Week 5: Maya organic modelling, UV unwrapping and ZBrush detailing
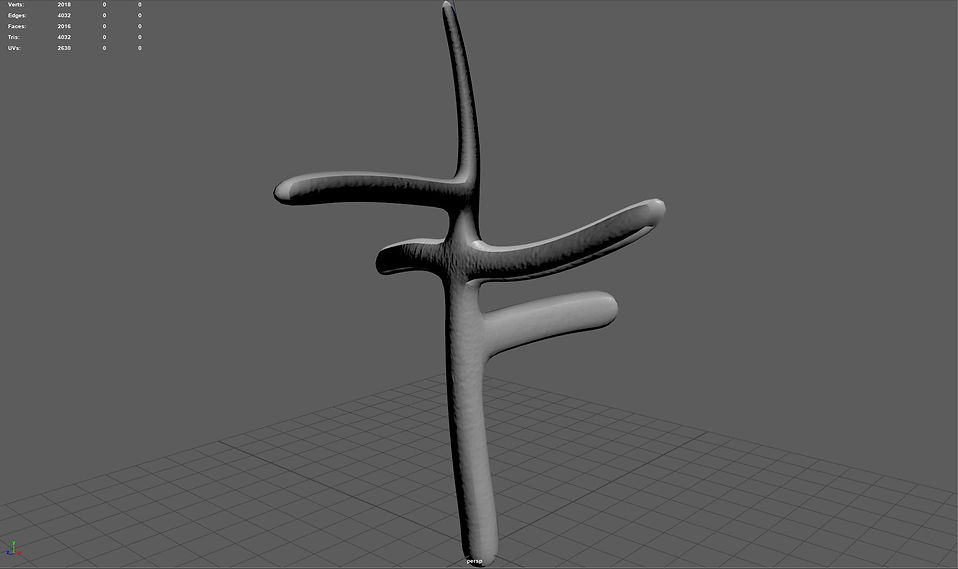
This week in CGI foundations I learnt about Maya organic modelling by creating a simple tree like object using a simple cube and aligning it to a line that I have made using the CV curve tool. I then extruding the cube along the line in which I then extrude smaller faces to make branches as seen below:
Organic Modelling (Tree)
After I finished the modeling I then began to UV unwrap the object so for when I apply a texture to it, it should look perfect with no warps.
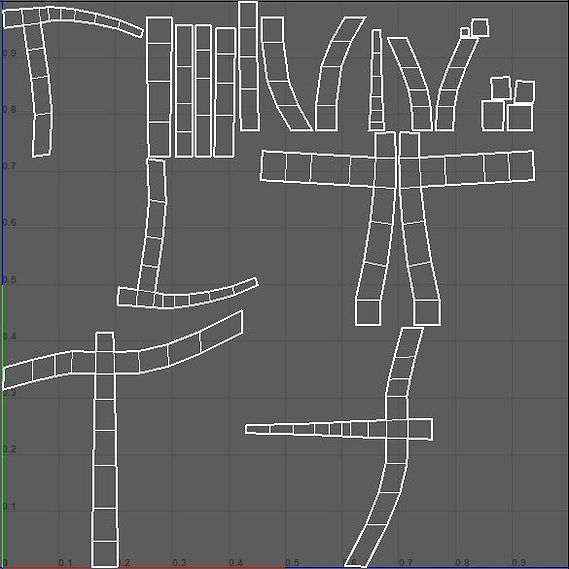
UV Unwrap View
Once all the modeling was done and the UV unwrapping was complete I then exported the object into an obj in which I then imported it into Zbrush where I then used the alphas to stencil out bark/wood looking materials.

Zbrush Alpha
Once I was finished in Zbrush I then bring it back into Maya and below is the final result.
Final Results in Maya
Week 6: Materials setup | Procedural Environments
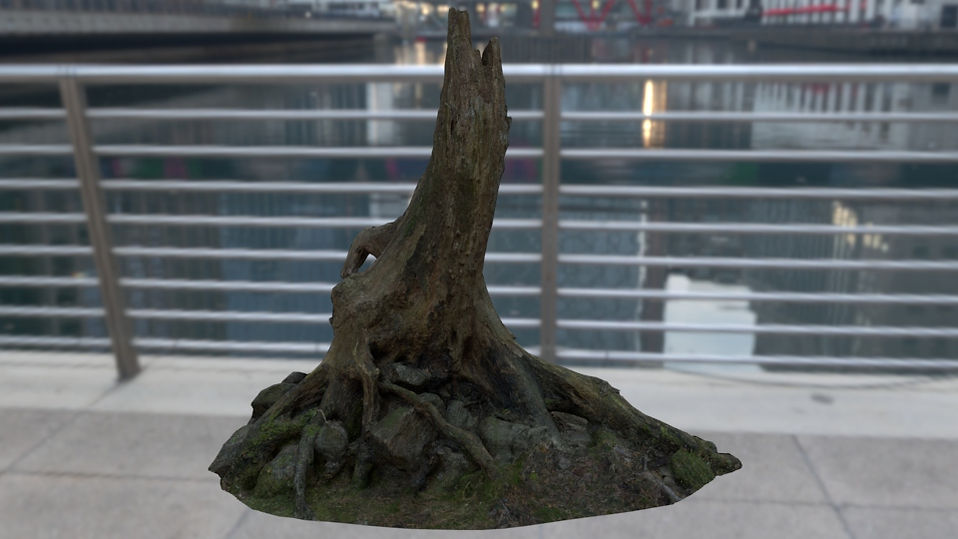
This week in CGI foundations we went over megascans and how to import it into Maya whilst also going over some stuff in unity such as procedural generating leafs. Below is a tree stump model that I have imported in from megascans bridge. As seen below it comes with a displacement map, specular etc,

Stump from Bridge
Render in Maya

Hypershade view
Next I went to Unity where I was shown how you can make procedural grass by downloading a standard unity grass asset that is available in the asset store as seen below:

Scene view
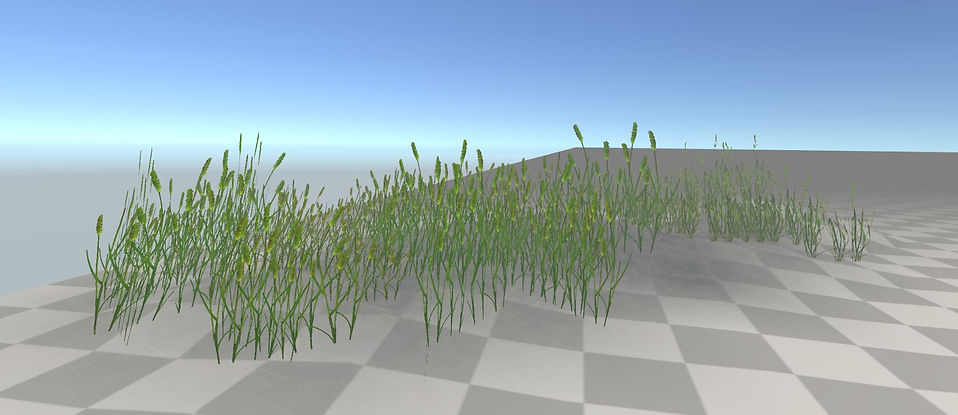
Game view
Week 8: Substance
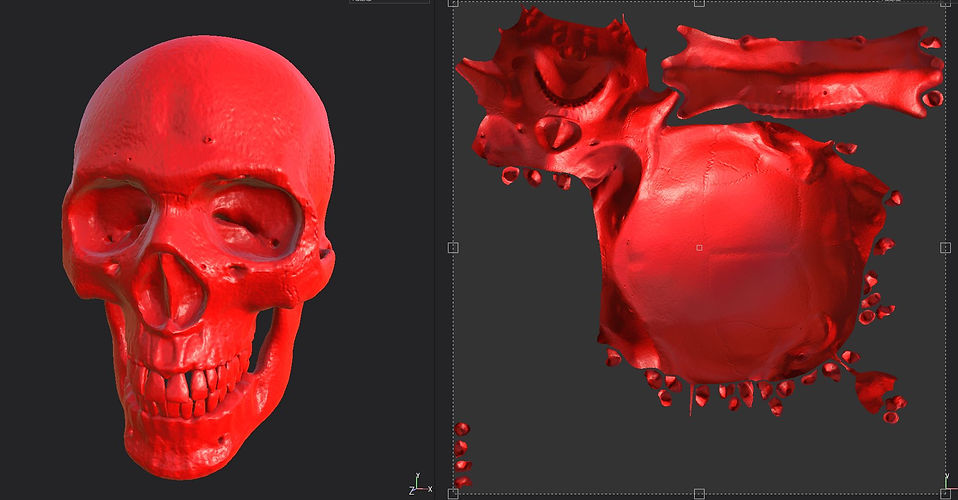
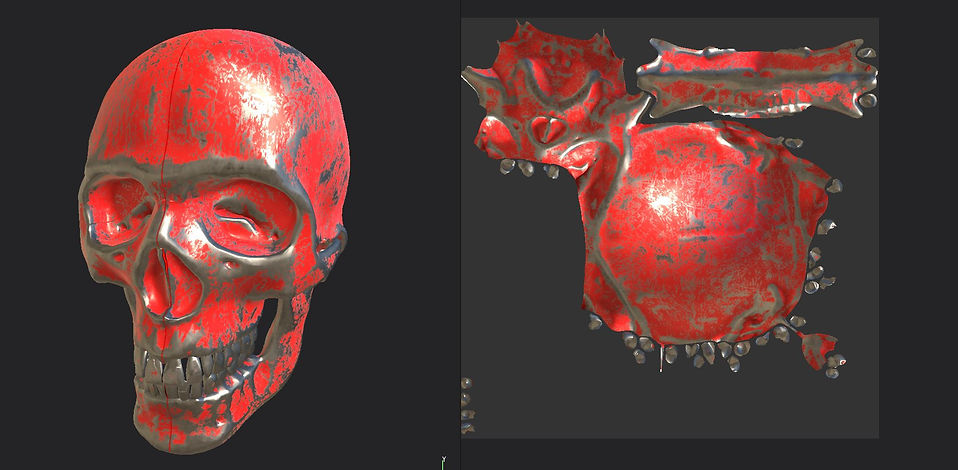
This week in CGI foundations we had an introduction on how to use the basics of Substance Painter. Below is the process that I used to create a skull that has textures and lots of alpha stamps on it:

Above I have imported an asset from the substance launcher in which it has imported it from sketchfab. The left view is the skull in a 3d space and the right view is the skull in a 2d space with has also be unwrapped.
Next I added an iron raw shelf material preset and that gave the skull a metallic look. I then gave the skull a fill layer and changed the colour to red as seen above. Below is the layers view of how this looks:

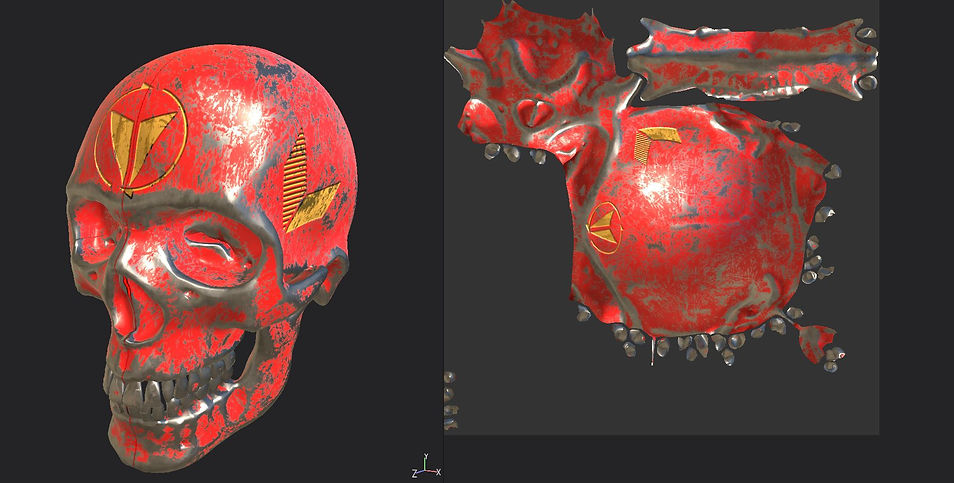
Below I then added a mask and a metal edge generator which makes the red fill layer only apply to the edges but I then inverted it to make sure it ignores the edges as seen below:

Below I then added some alpha stamps which I used the yellow colour to apply them like with the photo below. I also added some blue stamps to create some more detail to the stamps.
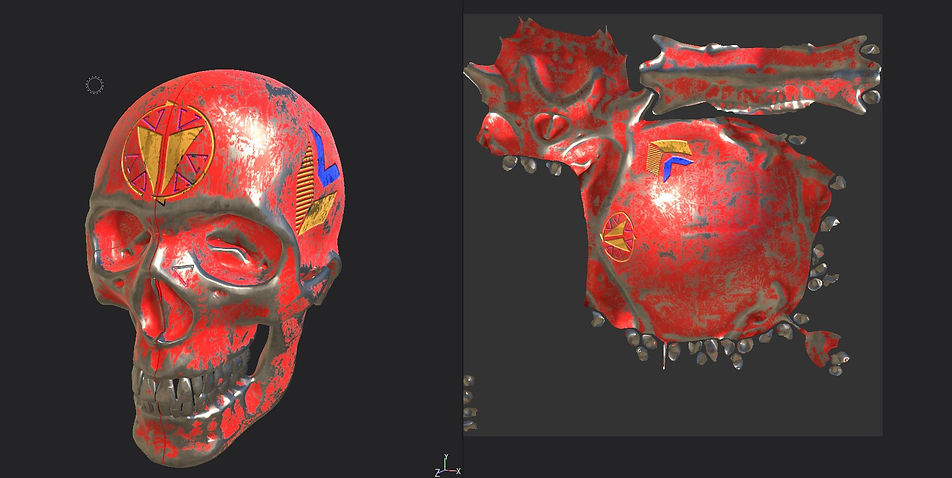
Once I finalized everything I then changed around the settings in the environment settings which adds a background in behind the object:

Week 9: Substance to Maya
In this week for CGI foundations we got introduced into how to export substance painter files into Maya. Below are the steps that I took to make that work.

Above I have set the settings for the sample frog that I imported into substance painter. Here I have made sure that the Arnold set up was selected and also changed the resolution to 2048.

Here I this view of the frog imported into Maya but with out the textures yet as below are the screenshots of the process of getting the textures on.
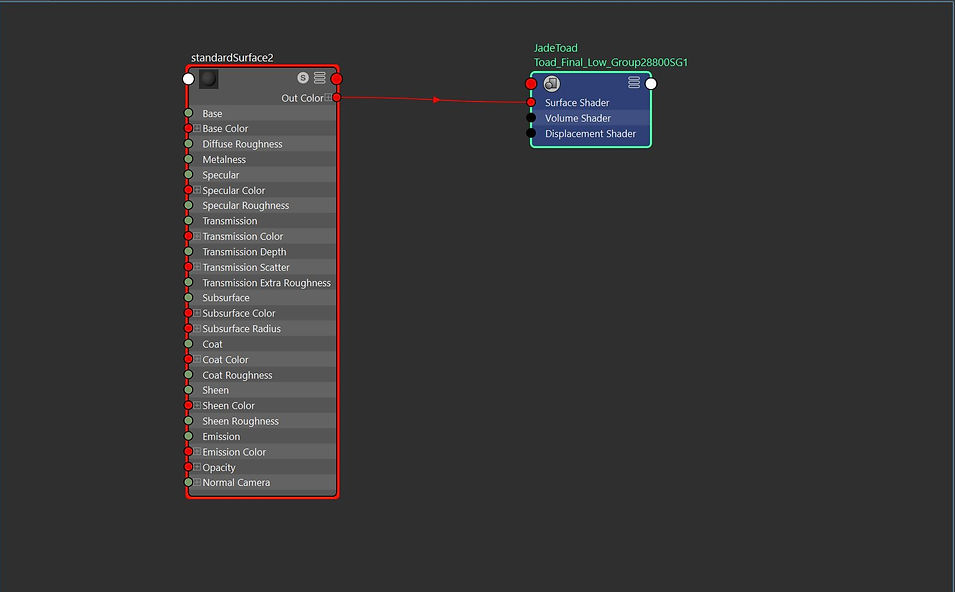
Above I have added an aiStandardSurface texture to the toad.
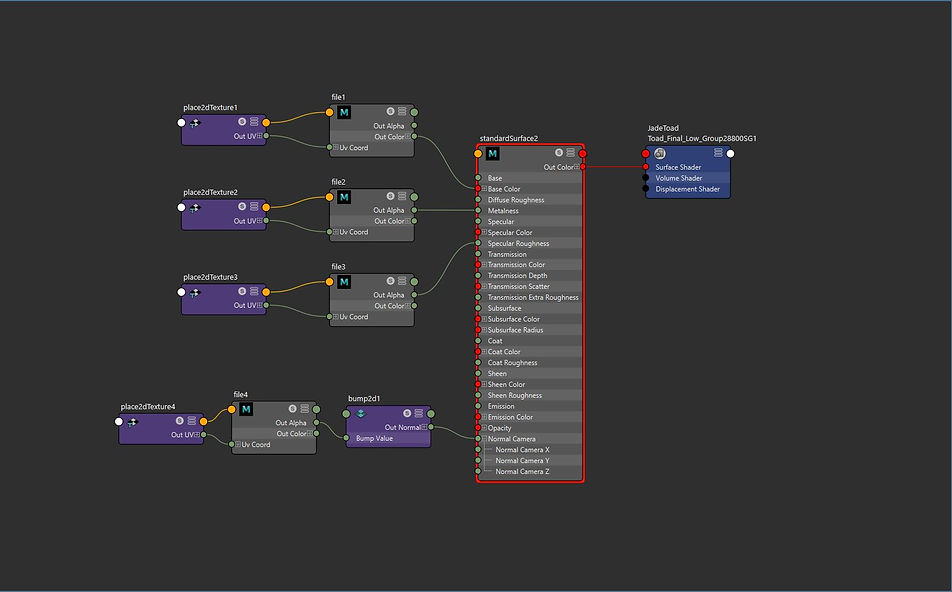
Here is the screen grab of the files that I have added to the aiStandardSurface. I have made sure that each of the files added were the correct ones as the metallic file has to be connected to the metallic node. I have also changed the colour space to raw and turned on colour luminosity.
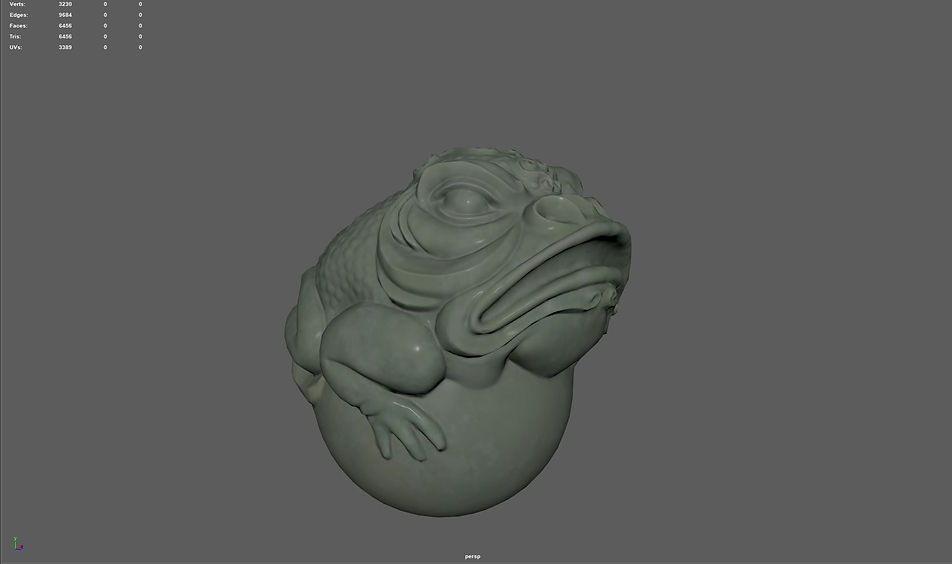
Above is the view of toad with the textures added in the perspective view of Maya.
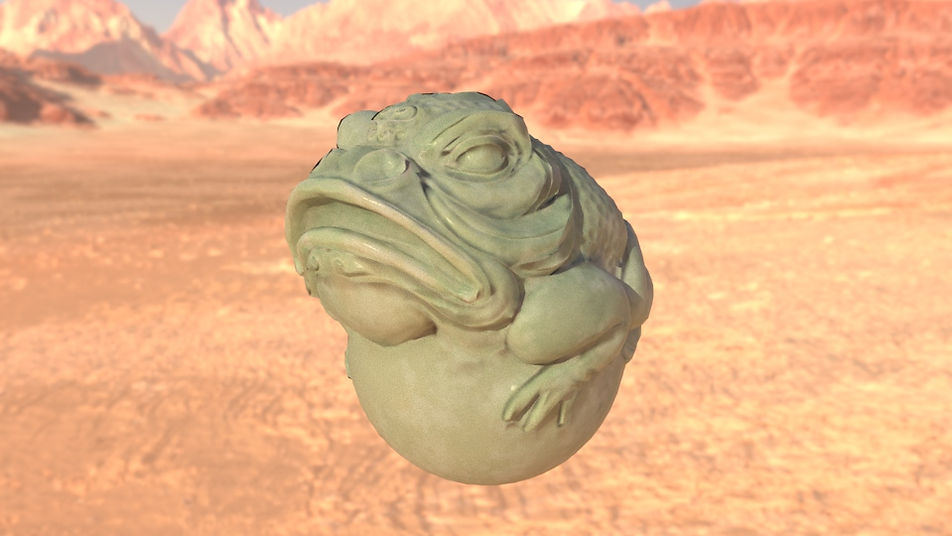
Above is the view of toad rendered with an HDRI environment in the background.
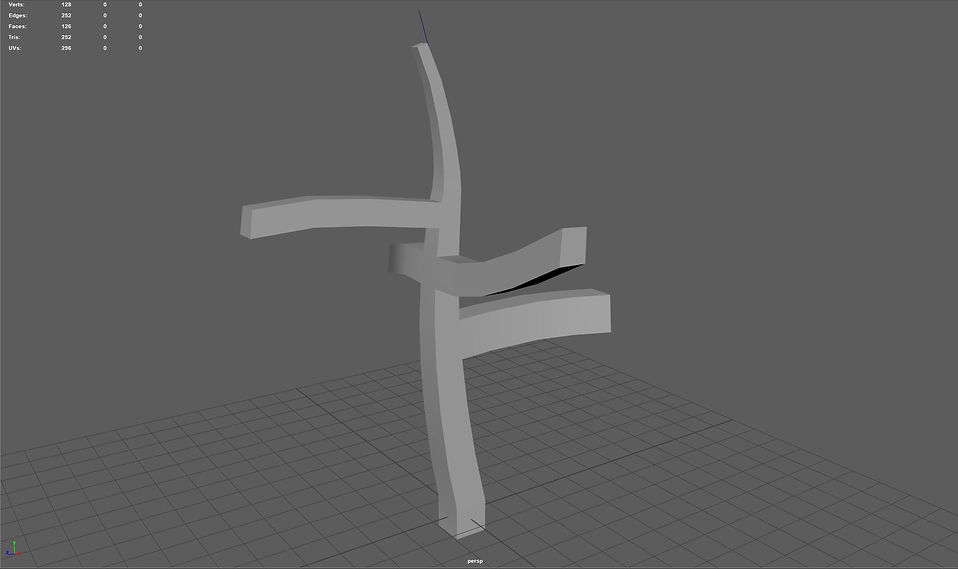
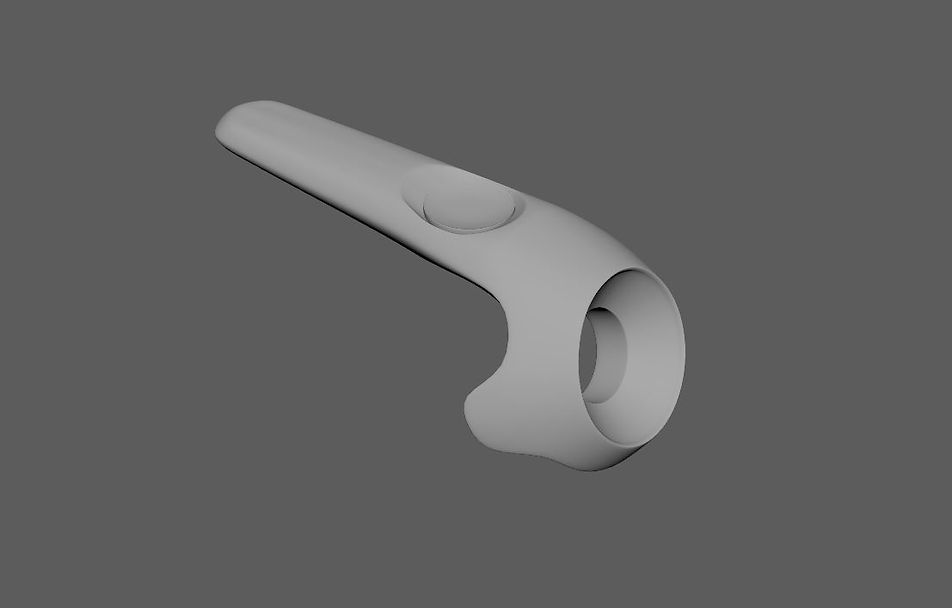
Week 11: NURBS and Poly Surface Modeling
In this week for CGI foundation we had a look at NURBS and poly surface modeling. NURBS stands for non-uniform rational b-splines and they can be very useful for very smooth objects. The images below show a process of poly surface modeling

Above I have created two image planes for a top view and a bottom view of the HTV Vive controller in which I have created two other objects, a plane for the grip and a cylinder for the rounded end of the controller.
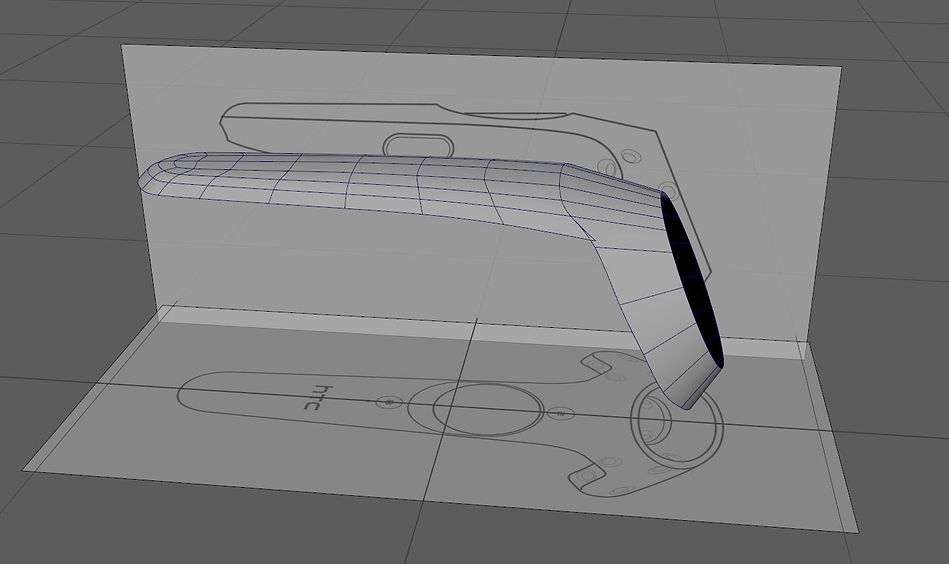
Next, I connected the two objects by inserting edge loops on the cylindrical object and then used the merge tool to connect the vertices together.

After the parts were connected properly I added more detail to the end of the controller in the finger protectors and also more edge loops and detail on the inside of the cylinder.

I then added a button in the center of the controller which to do that I created a circle that was separate from the controller and then created a dip in the controller to fit the circle inside. I also had to create many different edge loops inside the circle to make it more smooth.

Finally, I added some more detail to the handle in which I created a bit more of a bump as this is the grip for the person's hand. Below is the final result of the Vive contorller.
Assignment 3: Personal Development
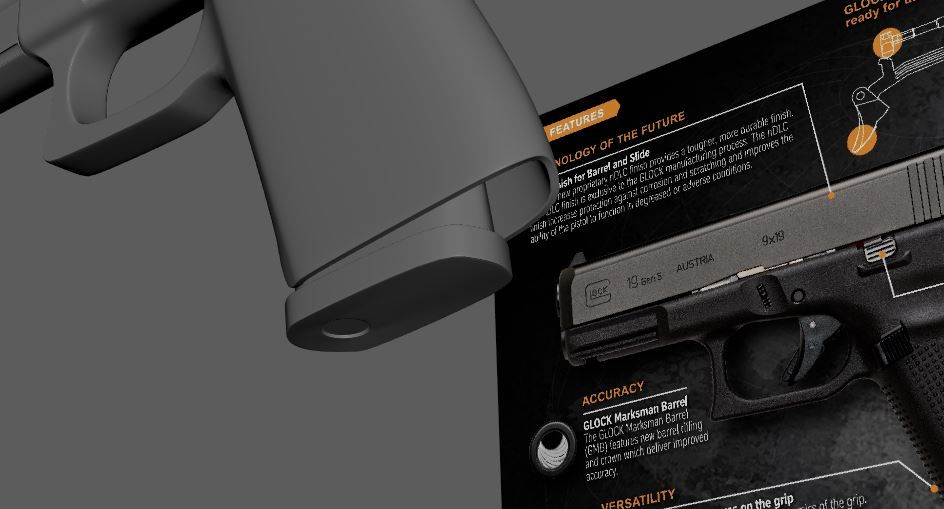
For the final assignment (Personal Development) I wanted to carry on with the poly surface modeling techniques that we have go through in week 11. My initial idea was to model a spitfire, a world war two British plane. However, I did not like the way it turned out so I then went to look at weapons and I found the AK-47 was an interesting one that I could model but I wanted something smaller so I found that the Glock pistol was a very cool looking pistol that I could model. Below is my process for making the Glock.

I first added in an image plane with the Glock pistol and began to work on the top half of the gun first. I created a simple box and started to model around that creating edge loops as I went along to create the shape of the barrel and receiver of the gun. I also used the circularize tool to create the gun's barrel and the other circular part of the gun on the front. I also created two extra cubes to make the gun's sights and then again used more edge loops to keep the shape of it for when it smooths out. Above is the finished result of this part of the gun.

I then focused on the other half of the gun and to do this I created another cube which at first was very rough and I then overtime defined the shape more as the important parts to refine out is the guard for the trigger and also the curvy grip at the back of the gun. As I progressed on this object I then began to add more detail e.g. the end of the barrel with the dips in the gun as to do this I used the extrude tool a lot to dig into the gun. I also added further detail with the dip on either side of the gun just above the trigger.
Next, I added another cube for the magazine and I just adjusted the vertices to match the reference image and just heightened it to make it hide in the guns magazine holder. I also used the circularize tool again the add extra details on the bottom of the magazine.

More detailing was needed for the gun and the next section to do was the grip of the gun and to do this I first created a cube and then just flatten the top a little bit to make it more smooth. The next step was to duplicate this object enough times to match the reference image and then I just placed it over the desired area of the grip and used the lattice tool to adjust some areas that were not fully placed on the gun. The front and back of the grip were the hardest as this required to use to bend the tool to mold it around the curve of the gun.

The trigger of the gun is a very important piece the makes a gun a gun and to make that I created it using the create polygon tool as I found that doing that was easier than create a cube and adjusting the vertices. I also used the extrude and bevel tool to create the extra detail in the trigger.
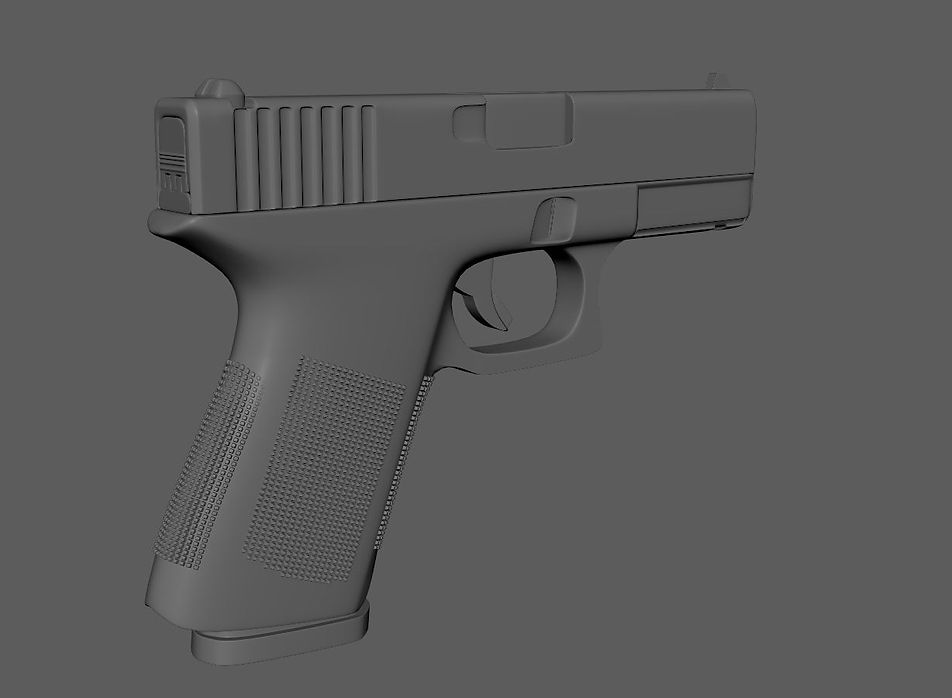
Once all the important areas of the gun were refined to a good level I then went back over the gun and defined some more areas as the back of the gun needed some detailing and also the gun's receiver. I found that using the weld vertices tool helped a lot when creating holes for the gun's receiver and also smoothing it out.

The next thing to do was get the gun ready for rendering and I duplicated the gun to make the render look more interesting. The textures that I chose on the gun were a simple metallic black for the base color of the gun and also a gold color for the gun's barrel as I found this made the gun look like a warlord weapon. I also used the directional light as this allowed me to focus on the areas I wanted to in the render. Below are the final results of the render.

