Week 1- Quad Draw
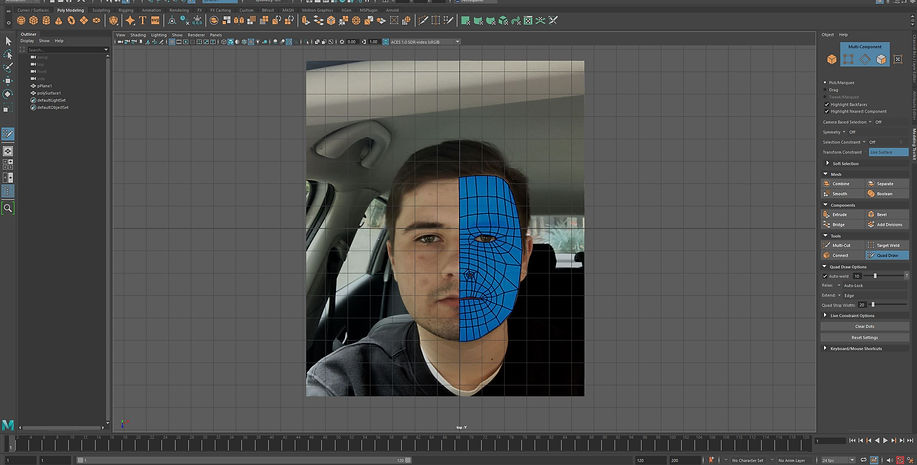
In the first week of this module, we got introduced to the tool 'Quad Draw' in Maya. Quad Draw is a tool that is used for retopology. The main exercise this week was to use the Quad Draw tool to recreate my own face in Maya and also gain an understanding of how to use the Quad Draw tool. Below are my processes for this week.

The image above is of me trying out the Quad Draw tool, I first needed to make sure the sphere was in 'object live' mode before then navigating to the right of the screen to select the Quad Draw tool. I made sure to go through all the keyboard/mouse shortcuts to get familiar with this tool.
Task - Modeling my Face using the Quad Draw Tool

Above I started to model my face using the Quad Draw tool, I started first with one eye and also with half of my mouth since I will mirror that one side of the face when it's finished. I then connected the eye and the mouth together and also worked on the nostral and nose whilst making sure that the topology was correct so I could insert edge loops.
Finished Model of One Half of Face

Above is the result of using the Quad Draw tool, I now need to model the plane above further by using the soft select mode to select certain vertices in which I will adjust them using the move tool, extrude tool, etc.

Next, I used the 'Subdiv Proxy' to mirror the other side of the face so that I could have another view of what the face would look like when smoothed. The Subdiv Proxy will be deleted when the model is finished since it's not part of the original mesh.

Iteration #1

Face Front

Face Side
Week 2- Retopologise ZBrush
In the second week of this module, I had a look at retopologising in ZBrush where I used the topology creation tools such as 'ZModeller and ZSphere Retopologise'. The two exercises this week was to first use the DemoAnimeHead as a template and rebuild the face topology using the mentioned tools and also to use the DemoAnimeHead again to rebuild a part of the head using the ZModeller approach. Below are my proccesses.
Exercise 2 - DemoHead using ZModeller

In the first exercise, I used the demo head where I also used the topology tool to create my first polygon that I will be working from to create a sculpt of the head above.

I had to make sure that I was only adjusting the edges of the polygons and not the faces or the vertices as the image above shows that the polygons were set to do nothing whilst the edges were set to extrude.

I made sure that the face mask that I created using the ZModeller wrapped around just the face and stopped just above the forehead. The difficult part that I found was to model the nose area of the mask.

Finished Face Mask
Exercise 2 - DemoHead using ZModeller

In this second exercise, I used a more complex DemoHead in which I will still be using the modeller to create a simple face mask. The methods that I used to approach this exercise did not change from the previous one but required me to create more polygons that better molds around the increased polygon count DemoHead.
Week 3- Hard Surface Modelling - ZBrush
In the third week of the module, I had a look at hard surface modelling in ZBrush where I used tools like ClipCurve, TrimCurve, SliceCurve etc. Below are examples of how I used these tools to create hard surface models.
ClipCurve Example
TrimCurve Example

The object above was made using the TrimCurve tool in which I just cut out two lines and then used the transform tool to move the individual objects closer together to resemble a sort of helmet.

Next, I used the SliceCurve tool to implement a slice in the geometry of the sphere where I then used DynoMesh to retopologise the sphere with that new geometry to create a line. To make the line smooth like seen above I used the smooth tool where I focused on the edges of the line.
Adding A Star
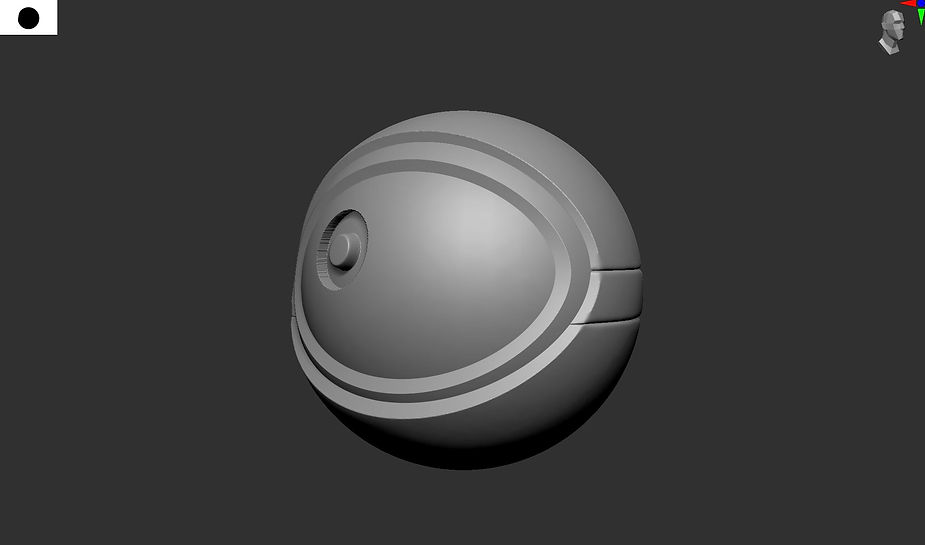
I then added a smaller circle as seen above where I used the alpha tool to create a dot in which I then used the transform tool to push it back and then used another dot to push that one forward to create the result above.
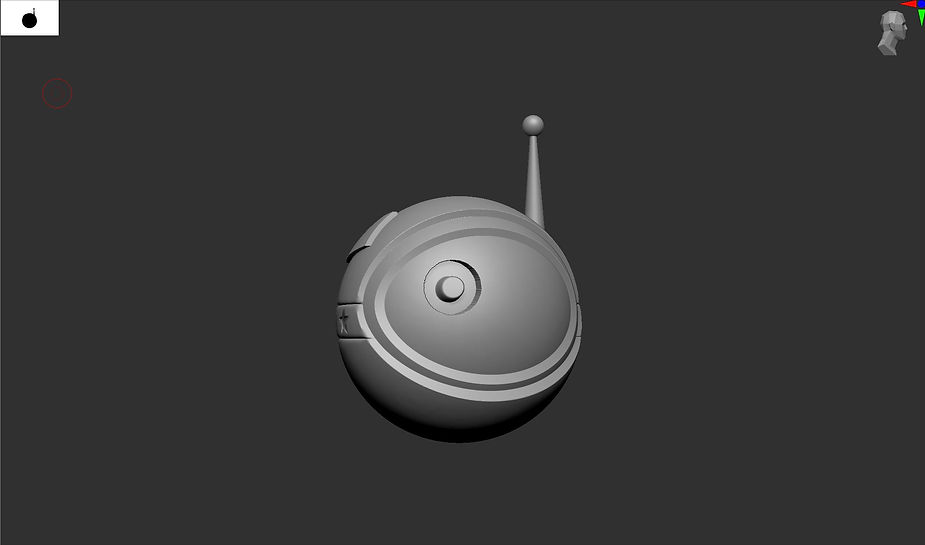
Next, I created an antenna on the right-hand side of the satellite by appending in 3 spheres in which I transformed them in the correct location then connected them up with the transform tool whilst only selecting a half of one of the spheres to act as the bridge that connects them.
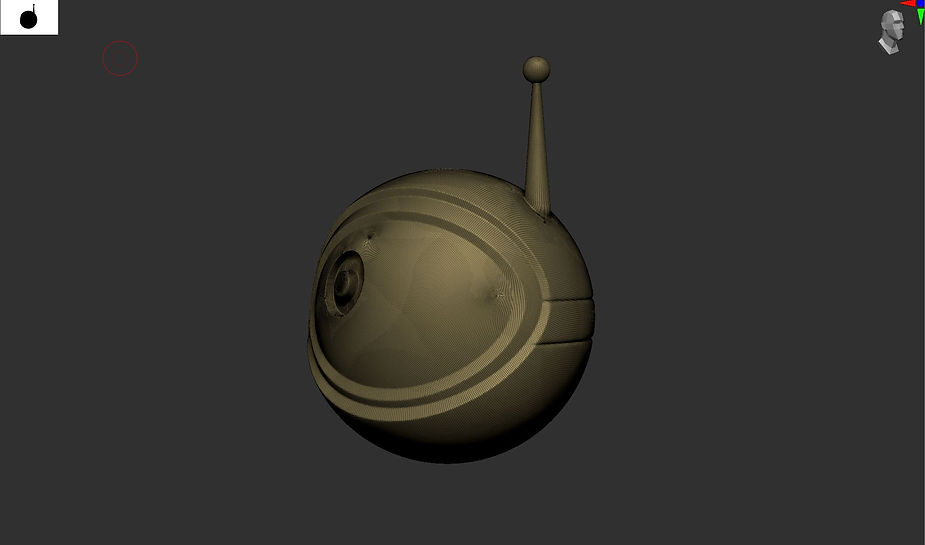
Finished Model using ZRemesher

I then exported the object into an OBJ in which I imported it into substance painter and applied a texture to it as seen above. I used a generator to create the rough look with the dirt preset.
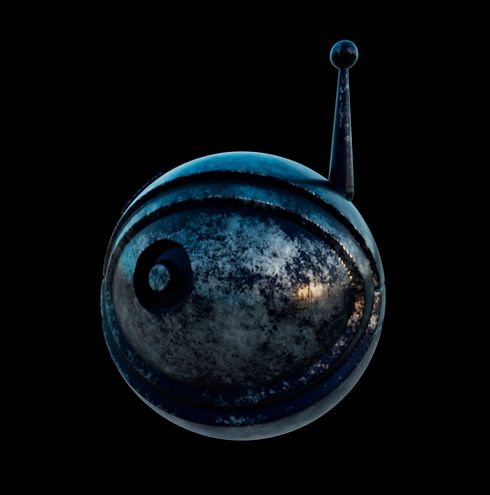
Final Result Using Maya Render
Week 4- HumanIK in Maya. Simple Rig
In this week for the module, I had a look at rigging within Maya by using the HumanIK controls. In the first exercise, I imported a simple skeleton rig and also motion capture data and then combined the two together in the HumanIK to allow the skeleton to move with the motion capture data. Below are my processes.

Above I have imported a simple skeleton model where I used the quick rig option in the HumanIK section to generate a rig. I had to make sure that I moved the points in certain positions as the elbow joints were not in the right place and I needed to do this to other areas.

Here is the skeleton rig generated from the quick rig tool. I made sure all the joints were in the correct location when creating it.

Next, I imported the motion sequence that will be connected to the skeleton rig to generate the movement. When importing this sequence I needed to make sure that I adjusted its translation so there will be no issues when playing it.

I then needed to connect the correct body parts of the motion sequence to the correct body parts on the skeleton rig that I have created. I needed to do this for all the body parts seen in the HumanIK tab on the right of the screen.

Once all the body parts were connected to each other, the skeleton rig can now perform the movements that the motion sequence can do.
Final Result
Week 5- Substance Painter Workshop
In this week for the module, I have had a look at substance painter in more detail this week as my task was to texture and render an oil can in substance painter. Below are my processes for texturing the oil can this week.
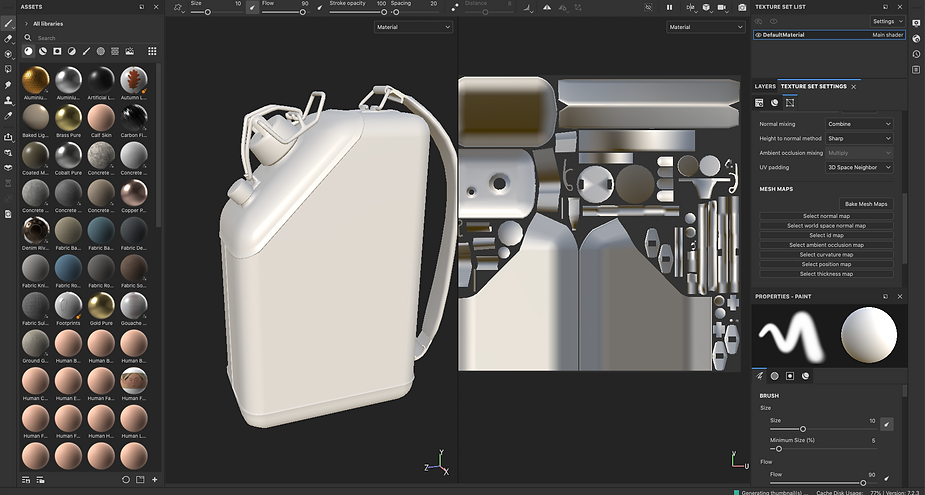
I first imported the oil can into Substance Painter as seen above and made sure the texture resolution was set to a high one.

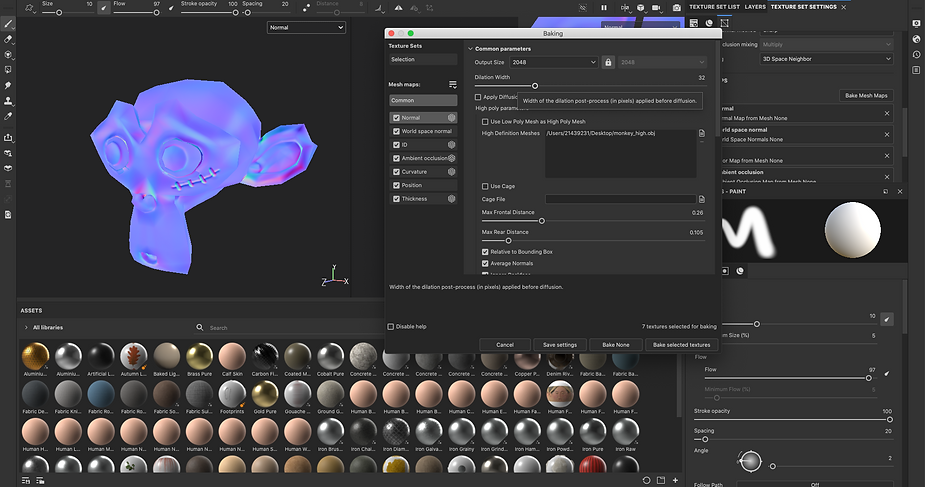
I needed to bake the model since the oil can contained a lot of polys that were not needed for texturing. I made sure that the output size was 4096.

I then began to start texturing the oil can so I first added the brass pure texture and applied a black mask to the oil can so I can only texture certain areas of it.

I changed from the brass pure texture to a dynamic texture which includes additional maps like rust and dirt to make the oil can look more old and unused as seen above.
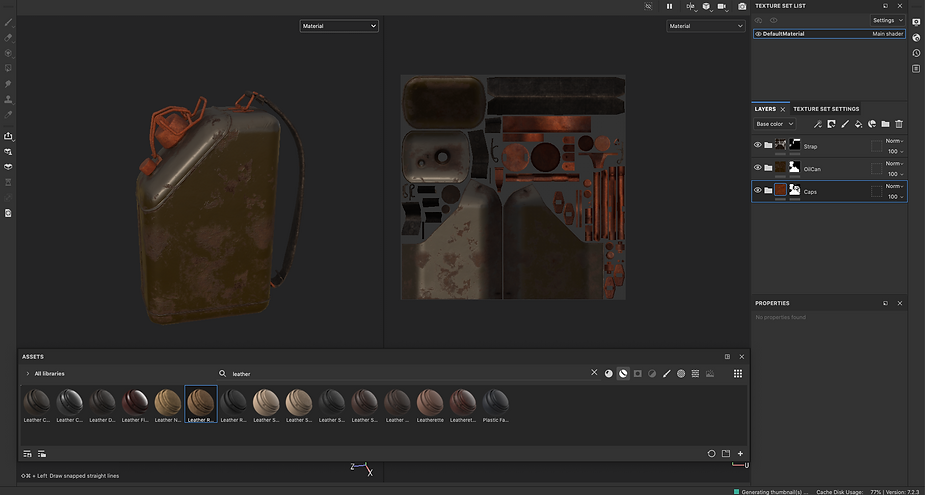
Additionally, I textured the caps with a rust material and also the strap with a rough leather material which is also a dynamic material.

Next, I added a corrosive warning texture but to do this I first needed to find the png of this texture online and adjust it in photoshop to add an alpha layer so I could use this in Substance Painter. Once in Substance Painter, I used the brush tool to plant the texture on a side of the oil can and then used the eraser tool to remove parts of the stencil to appear more rough.

Final Result
Week 6- Maya ZBrush Pipeline- Recap
This week for the module, I had a recap on the pipeline for getting a ZBrush model into Maya by using the ZPlugin tools and then rendering it using the cat Clark render tool. Below are my processes for this week.
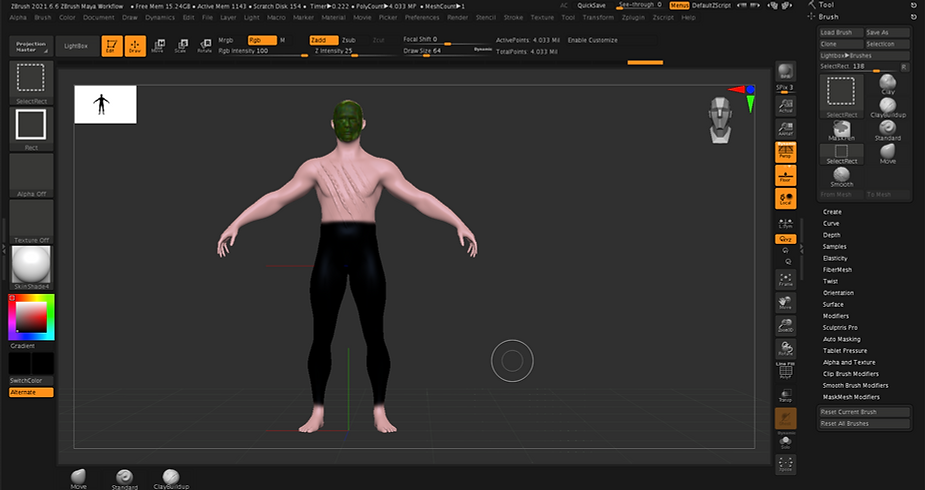
Above I have imported a simple demo model in which I painted the body with green face paint and black leggings. I also applied a claw mark to the chest using the Zadd mode and using an alpha. I needed to make sure this model was high poly as it will demonstrate the difference for when I render it in Maya.

I then needed to clone and unwrap the model so this data can then be compiled into Maya so it can apply the textures to it. I used the 'work on clone' button since it will clone the high mesh model into a low mesh model so that way ZBrush can unwrap the model better.
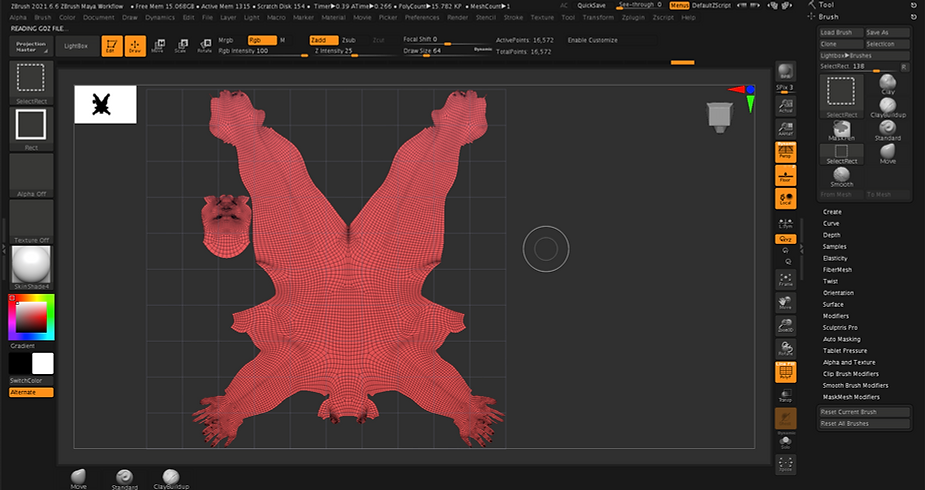
Finished Unwrap
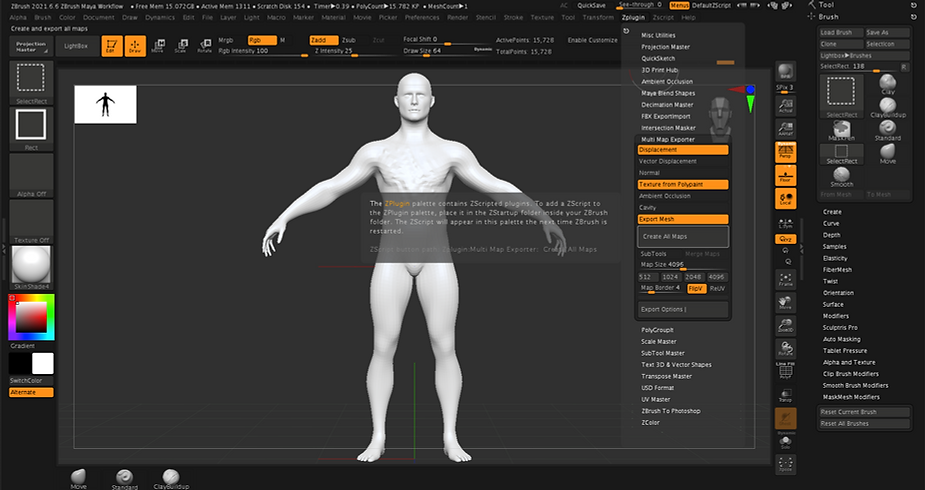
The final step to do before loading up Maya is to make sure that I export all the required maps that I will need to apply this data onto the model in Maya. I needed to make sure I exported the Displacement, Texture from Polypaint, and also the Export Mesh.
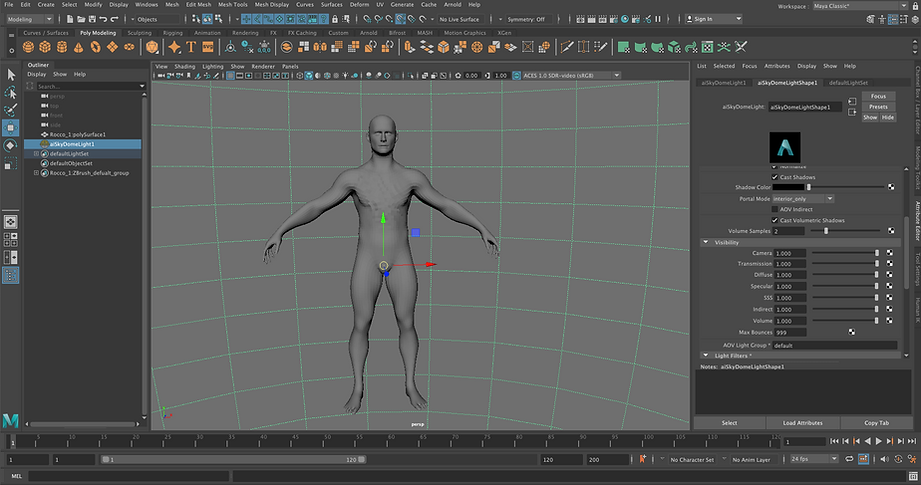
Above I have imported the ZBrush model into Maya now and I applied a default Arnold standard surface shader so that I can then attach the displacement map and also the texture from polypaint.

ZBrush Model in Maya

To achieve the final render above I created a skydome and also made sure that the Arnold cat Clark settings were set to an iteration of 5 since this was the amount of subdivision levels that I had in ZBrush.
Week 7: One to one Tutorials
This week for the module, I had a one to one tutorial with my lecturer to make sure that I am all up to date with the previous weeks and also started to talk about what I am going to work on for the upcoming assignment 1 of this module. For the first assignment, I need to create a mechanical rig in which it will be used for applying motion capture data.
Week 8: Substance Painter (photo-realistic texturing)
This week for the module, I have had another look at Substance Painter but in particular, I had a look at photo-realistic texturing. This is achieved by using the method of PBR texturing which is normally made up of multiple maps including the albedo, normal, specular, and roughness.
Above I have imported a low poly monkey in which I have baked it in Substance Painter using its high poly, I made sure that the max frontal distance setting was increased to improve the baked maps that were created.
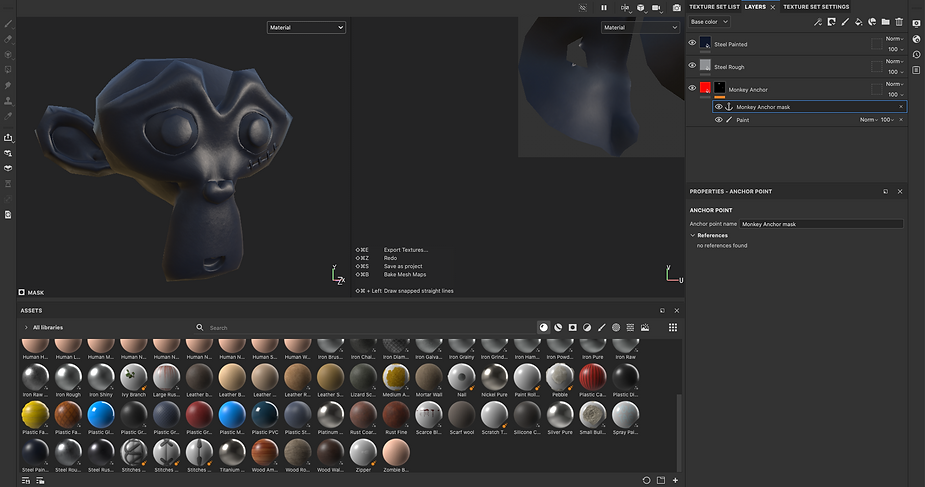
Next, I added two textures to the monkey with the "Steel Painted" and the "Steel Rough", I also created a new layer called the monkey anchor in which this layer will be used for creating my alphas on the monkey using the paint tool.

I then started painting over the monkey with a stencil that I have imported from the internet using the paint tool. I have applied this stencil over various places as seen in the image above.

After I finished painting using the stencil I then added a fill layer to the "Steel Painted" layer in which I also added the anchor to that fill layer as seen above. This fill layer and anchor will clamp the stenicl that I have made to the "Steel Painted" layer.

I then unhide the "Steel Painted" and "Steel Rough" layers as it was previously hidden when working on the stencil and the result is shown above.

To finalise the monkey I then added a "Rust Fine" texture to the model where I also applied levels, wrap, highness and a fill layer to apply the anchor point that I have previously made. I adjust all these settings to create the final image as seen above.
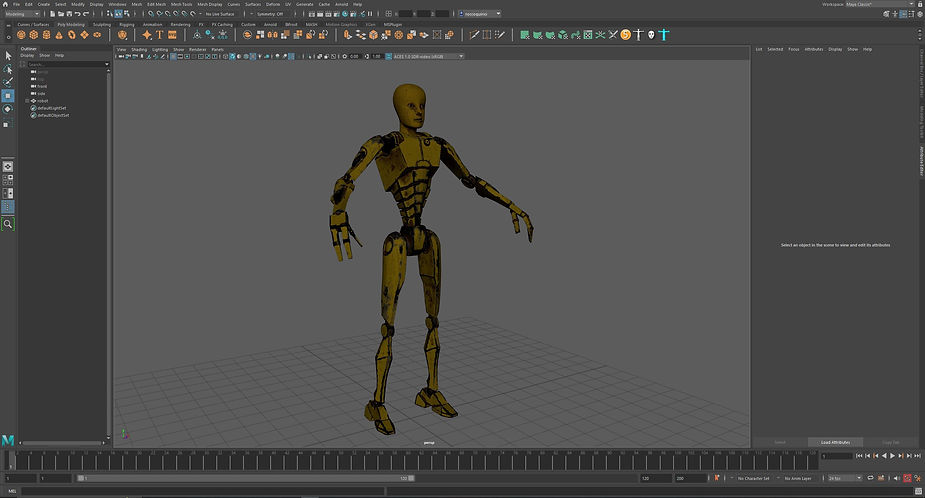
For the first assignment for this module, I used all of the knowledge that I have learnt in the previous weeks and applied this to making a mech character for the assignment. The brief for this assignment was to develop a mech character that will work well with motion capture thus I also needed to rig the mech. Below are my developments for this assignment.
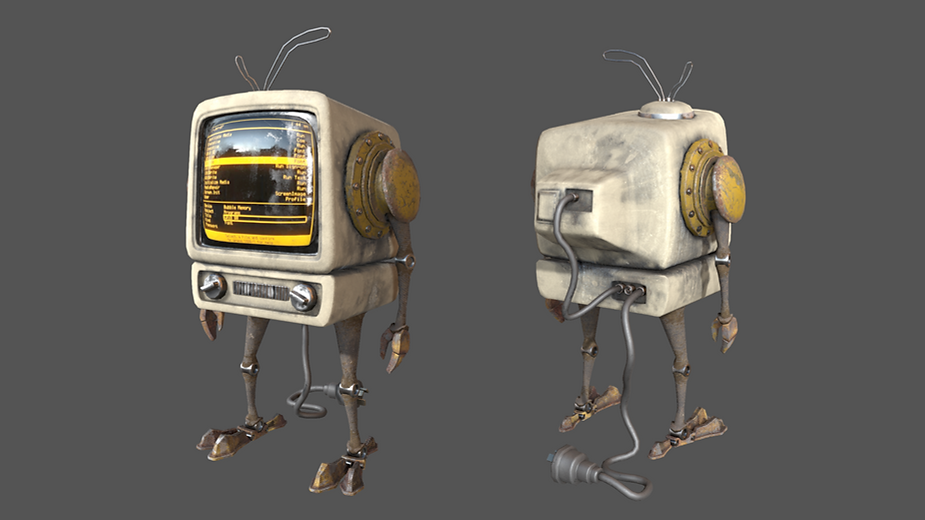
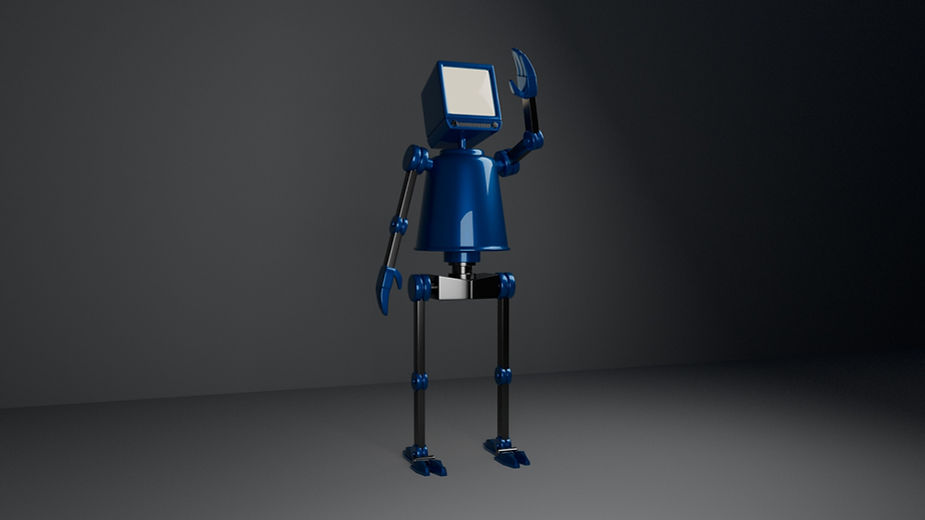
The image above is of something that I originally wanted to create when thinking about how to develop the mech character, however in further development, I found that I wanted to create a more mechanical looking character with nuts and bolts connecting the character. I will use the image above as inspiration for creating the tv as the head of the mech.
Developing My Mechanical Character
I first started off by creating the torso, legs and arms of the mech as seen above in the image. I have only modelled one side of the arms and legs since I will use the duplicate special tool to mirror these across.

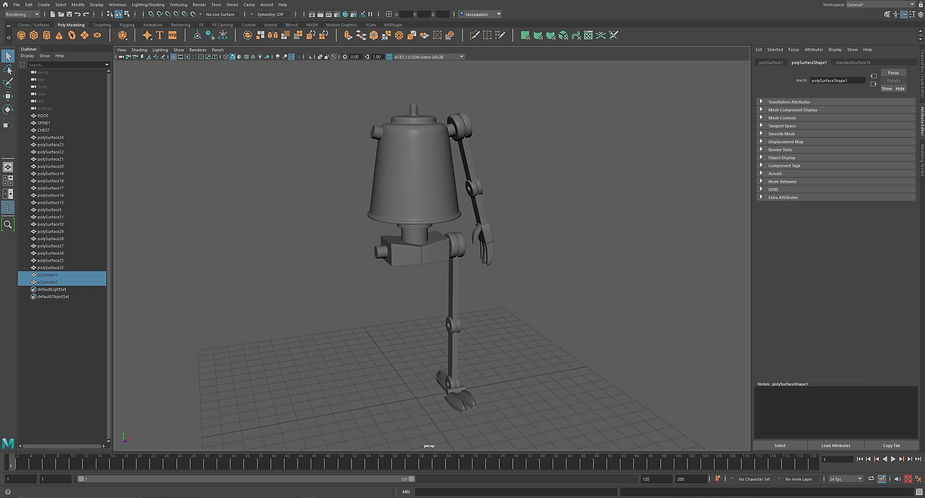
When it came to modelling the head I have taken a lot of inspiration from the tv robot mentioned above but I have made mine to my own scale and blended it in with the theme of a mechanical robot.
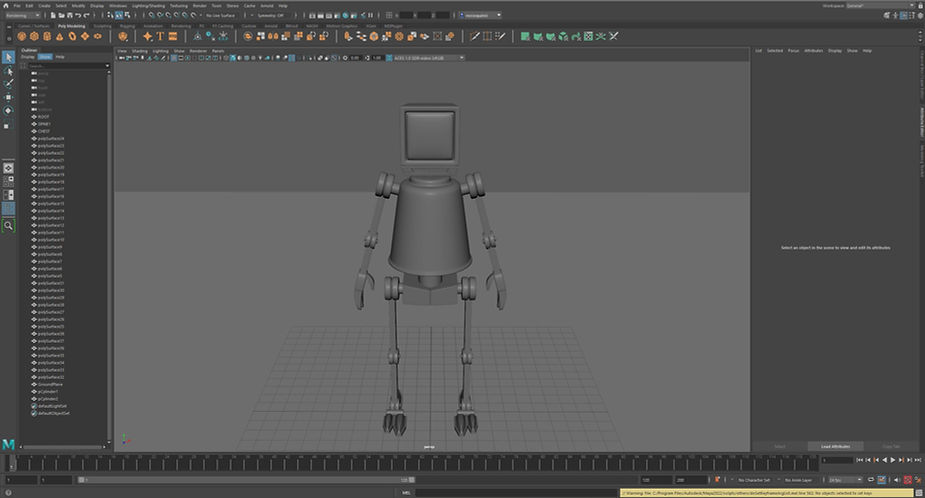
Once everything was ready I then used the duplicate special tool for the legs and arms and also made sure to delete the history and freeze the transforms of the mech so it was ready for rigging.
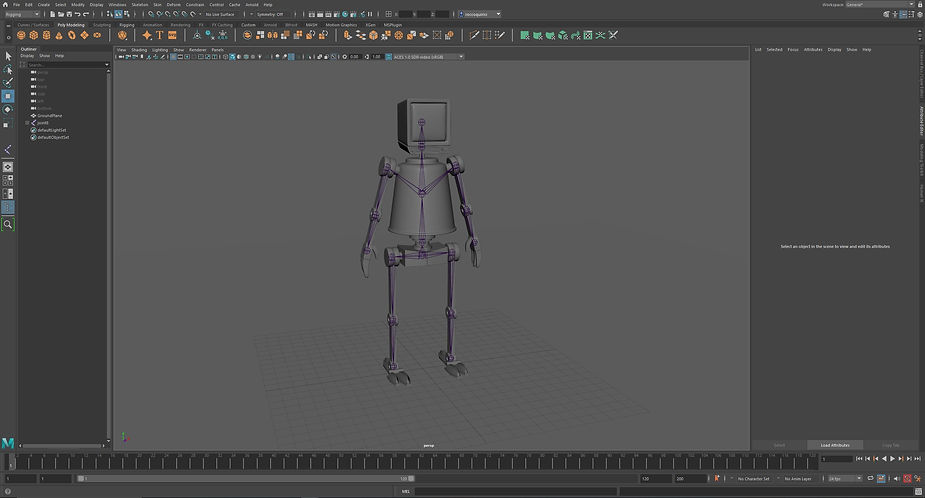
After the modelling was complete I then set up the rigging of the character so I could be ready for motion capture and also so I could create some poses for when it comes to rendering.

I then set up the scene with lights and a skydome so it was ready for rendering my final JPEGS, I have also set the mech into a pose by moving the joints which are connected to the mesh. I used an two area lights to cast extra shadows on the mech.
Final Renders


This week for the module I have had a look at Mixer and Bridge but in particular at importing assets from Bridge into Maya. The main exercise for this week was to create an environment for my mech character to be placed into using assets from Bridge. Below are my processes.

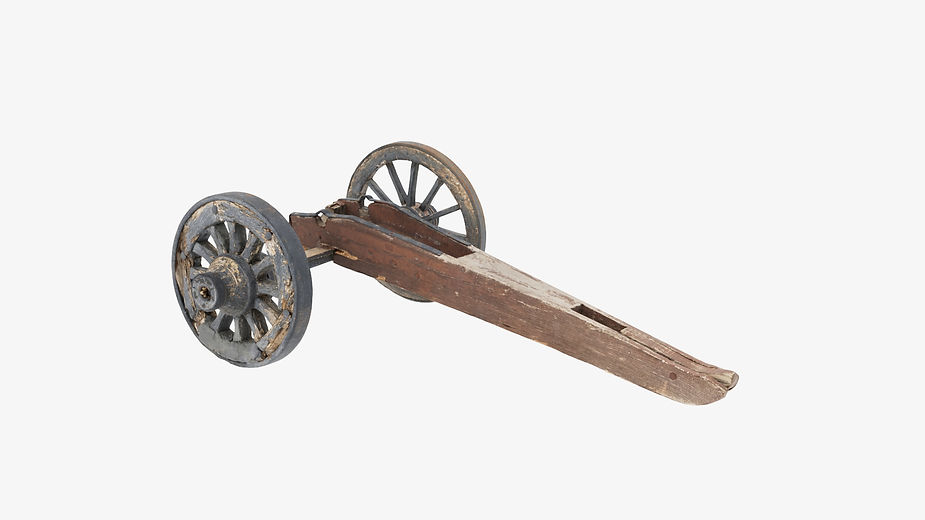
Above is an example of an object that I will import from Bridge to Maya. I have made sure to set the resolution to 2k since anything higher will result in a higher render time in Maya. I have made sure that the Bridge plugin is enabled in Maya as this will allow me to transfer the asset.

Here is the 'Old Cannon Trailer' in Maya, Bridge has also imported all the textures including the displacement map. The object only looks low poly in the viewer above as the cat Clark Arnold render settings cannot be viewed in the viewport.
Asset Rendered with Arnold
Creating an Environment Using Bridge
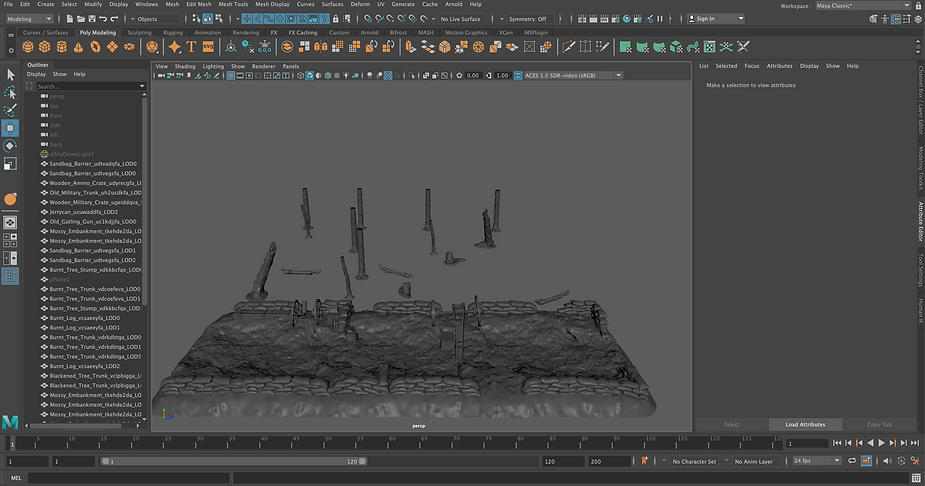
The enviroment that I have started to create will be reminiscent of a landscape of WW1 and the theme of no man's land with a trench. In the scene above I have imported multiple assets from Bridge into Maya and I will also add a texture from Bridge to a plane to create the muddy floor.

For the rendered shot above, I have added a plane and deformed it using the Maya sculpting tools. I also added another plane in which I place a file of an image depicting a no-mans land during an unknown battle. The image however would need some adjusting i.e noise and colour.
This week for the module, I have had a look at Mixer and how to create and implement my own texture onto an object. I have also continued to look at Bridge as I used the textures from that software to implement them onto a object within Maya. Below are my processes for this week.
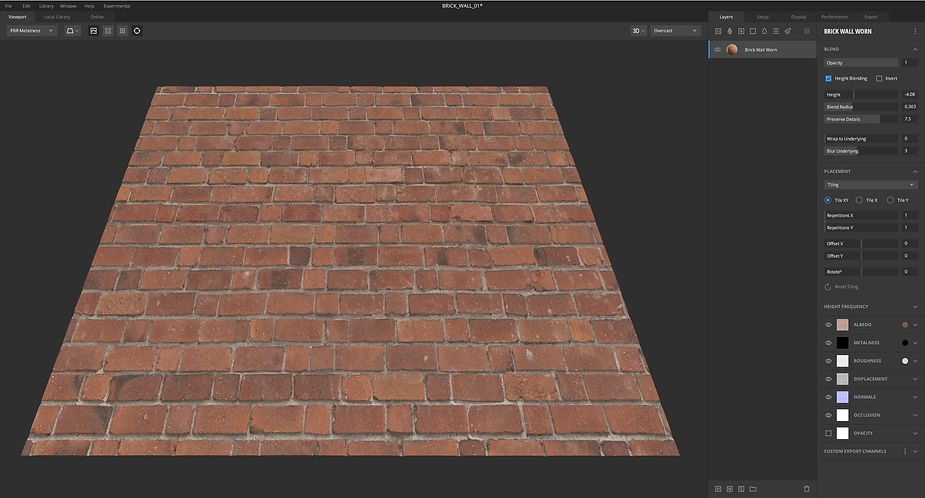
Creating A Brick Wall Using Bridge

Above I have imported a texture from Bridge which was the "Brick Wall Worn" texture and placed it onto the 3D wall I have made above. As this texture is imported from Bridge it comes with premade displacement maps which I can just turn on by setting the wall to a setting of linear under the Arnold settings for the object as seen above.

By using the Cat Clark/linear rendering tools I am able to make the wall in the render above look more 3D rather than a 2D surface. However the higher these iterations go the longer the render times will be.

Alternate View of Wall
Introduction To The Basics Of Quixel Mixer
Above I have imported the previous worn brick texture into Mixer and I have played around with the settings to set the scale and tiling of this texture so that I looks natural.

I have above added another surface texture but here I have used the blend settings to mix the two textures together to create the worn down brick wall texture seen above.

I continued to develop the brick wall material above by using masks where I used the noise map to disperse the patterns. I added a worn plaster material as well where I have blended it in with the other two surfaces using a texture map.

Adding Graffiti

Render In Maya

The image above is of an export of the 3D wall model and texture that I have made in Maya. To import this I just had to export the model as an FBX
Week 11: In Class support for assessment 2
This week for the module, I had a one to one tutorial with my lecturer to make sure that I am all up to date with the previous weeks and also started to talk about what I am going to work on for the upcoming assignment which is the final for this module.
Assessment 2: Motion Capture Scene