Week 1- Intro to Nuke
In this first week of the module I have been introduced again to Nuke, below is a colour wheel image that I have implemented into the viewer to highlight the use of the nodes and how to origanise them properly.

To achieve the image above I made use of the Grade node, Blur node and also the transform node. To get these nodes into the node graph all I had to do was to press the tab key and then select the node I wanted as seen below.

I then adjusted the properties inside the different nodes that I have used to change the rotation and size of the colour wheel for instance. The properties tab on the right-hand side is what's used to adjust all the nodes that you put into the node graph.


The Merge Node
Above are two images that are merged into one using the merge node as above the man and the background are not the same image above, Below is what it would look like without the merge node in place.


Combining Multiple Merge Nodes

Orignal Image

Above is the woman cropped from the original image and below is the node graph in how it is done.

Node Graph for Cropped Woman

Above is the now the man cropped with the woman and the node graph below.

Node Graph for Cropped Man

Final Result
Week 2 - Organisation and Roto
Task 1- Basic Rotoscoping
In this week of the module I was introduced into basic roto and also organisation for file management. Below are screenshots that highlights my processes in this weeks lecture.

Above I have used the read node to import footage of some sweets falling and rolling around. I also then started to use a roto node to sketch out the yellow ball in the middle and for that, I had to find the "Hero" which is the term for finding the frame that you are going to work with and in this case, I used frame 1040. Below is the node structure and the roto result on the sweet.

Node View for Rotoscope
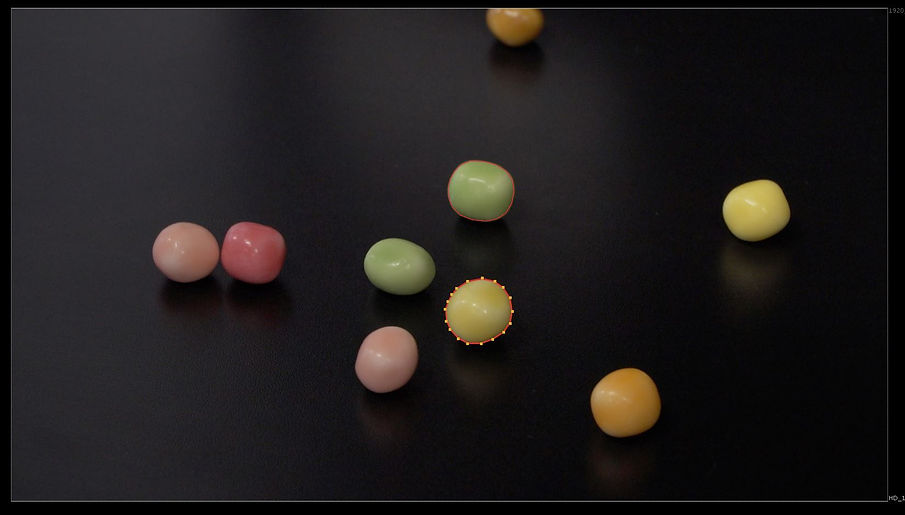
Rotoscope of Yellow Sweet

Rotoscope of Sweets using the Premult Node
Above is the final result of two rotos that I have done, I also used the Premult node as seen above, which will hide parts of the image that you do not want to show up in the viewer and as in my case it has hidden the other sweets and the background to only show to rotos.
Task 2 - Rotoscoping Continued
Below is another task that I did involving rotoscoping but with a moving image and how that works for when it is played. Most of the techniques that I have used in this task are the same as what I have done already with the sweets but with a rotoscope that will have to move with each frame, I had to change the position of the rotoscope a couple of times with different frames so the rotoscope sticks with the object throughout the video.

Rotoscoped Plaza

Node View for Rotoscope of Plaza

View of Rotoscopes with Blue Background
Final Result of Two Rotoscopes
Week 3 - Complex Roto
In this week of the module we went back to look at rotoscoping in Nuke but his time we had a look at how to roto more complex objects like for instance someone's hand. Below are the processes I took to roto out a hand.

Rotoscope of Thumb
Above I have rotoscoped out the thumb in which to do this I broke it down into different segments as this makes it easier to rotoscope individual moving parts of an object.

Use of Different Rotoscoping Tools
Here is a screenshot to show that I used different rotoscoping tools such as the B-spline and also the bezier tool as by combining the two cuts around the thumb better with the B-spline being used at the top of the thumb.

For a complex roto, I had to adjust the position of the rotoscope at each keyframe that would make it go out of position.

Complete Rotoscope of Hand
Week 4 - Basic Keying
In this week for the module, we had a look at basic keying and how to get it done in nuke. For the first exercise, I had to change the sky from an image with a new sky using the merge nodes but to get that done I had to do the following steps as seen below:
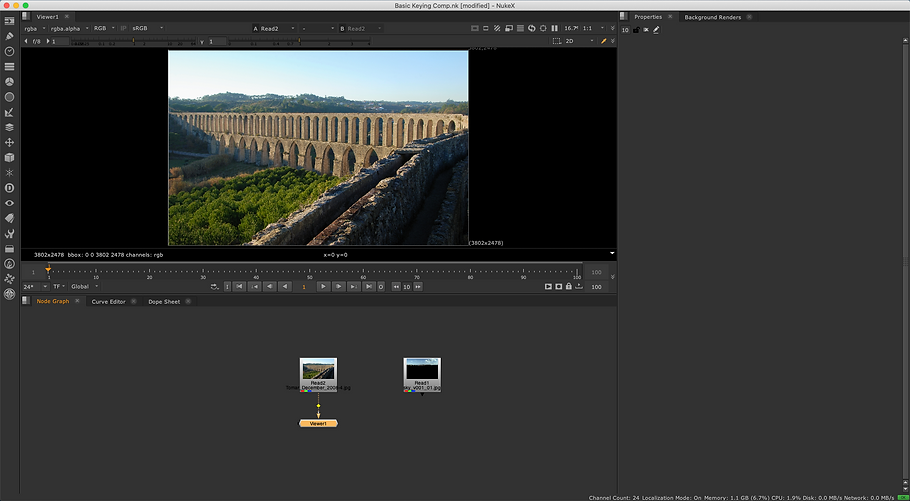
I first started with this simple scene above in which I am going to changed the sky with the new sky that I have beside the original image.

I then added a Keyer node in which I then changed the view to the alpha to focus on the white and black parts of the image, to find the correct balance between the two.

Next, I added a roto node to cut out the sky at the top whilst also making use of the blur node to smoothen the edges.

Above is the finished result of the task, I added a colour dilation node and also a light wrap node at the end to blend in the hilltops better with the new sky that I have given the image. Below is the finished node graph for the image.

Node Graph View
Task - Same Techniques on Two Different Images
Below I have changed the sky of another image and I have also used the same techniques as above, below are the results.

Original Image
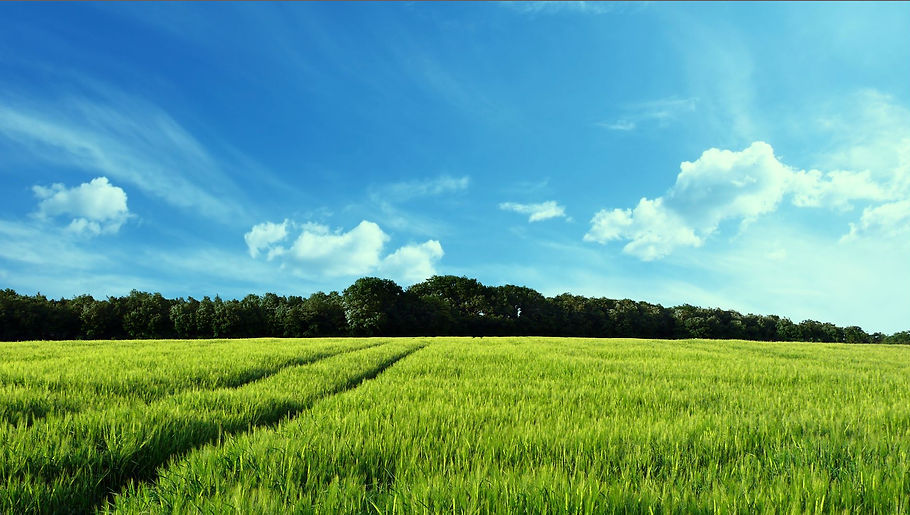
New Sky Image

Node Graph View
Task - Keying an Image With a Greenscreen

Above I have imported two images, one a girl moving with a green screen behind and also the background that I will be using to merge the girl with. I have also used the keylight (which I put as the BASE_Key) node to remove the green screen from the girl as seen above.

Alpha Channel View

Second Keylight Node
Below, I then added a roto node to create a garbage matte to remove the white parts in the corners of the viewer as seen above.

Garbage Matte
Once I turned off the alpha channel I then began to notice that there was some green screen spill, which is the effect that happens if the greenscreen is not fully removed from the background. To solve this I used the custom node Despill_Madness which fully removes the green screen spill. Below is the before and after of using this node,

Before Despill_Madness

After Despill_Madness
Final Result
Week 5 - Advanced Keying
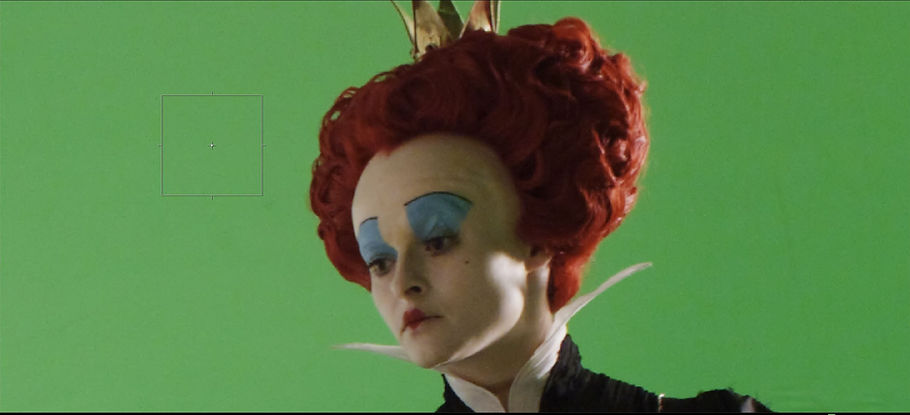
In this week for the module, we focused on keying out a person from a greenscreen again like I did last week. However, this week it was more advanced as the person that I keyed out had a greenscreen that had different shades and also not fully around her. Below are my processes for this week.

Above I have imported an Alice in Wonderland image that contains many greenscreens with different variations in green, this makes the keying process much longer than a regular clean greenscreen. I also used the Denoise node which enhances the image quality by removing noise that is in the image. Below is a before and after of the Denoise,

Before Denoise
After Denoise

I then followed the same steps as I did last week with the key light to highlight the area of the greenscreen that I want to concentrate on, in this case, I chose to do both sides of the head. I also added a roto on the sides of the face as seen below,

Rotoscope of Face

Once again I added a garbage matte to the background of the Lady as I do not want any of the background to show up in the finished image.

Alpha View of Lady

Finally, I added a premult to the node tree to cut out the lady and I also used another keylight node in which I changed the green screen colour to 1 to remove the green spill,

Final View of Nodes
Task - Additional Advanced Keying Excercise
For this exercise, I had to remove a lady from a green screen using the same process that I did in week 4 but this video has more variables that I have to work with. For example, I have to fully key the garbage matte as the woman sways her hair back and forth a lot and also have to key the dress that she is wearing. Below is the result.

Node Graph View
Final Result
Week 6 - Tracking in Nuke
In this week for the module, we had a look at tracking in nuke with three different ways of doing it. Below are my processes for this week in nuke.
Method 1

Above I have I imported a video as seen above of children playing musical instruments but the place in which I'm going to track and remove in the video is the sign above in white as seen below.

Next, I added a roto paint to remove the first line of text above and below is the result.

Next, I needed to add the tracker so that the removed text could stay that way for when the video plays and below an image to show that.

Final Result
Method 2

Above I have imported a previously used image sequence of a city flyover, but this time I have tracked the small air ventilation system as seen below using the tracker node and also a rotoscope node.

I then needed to track the rotoscope using the tracker node as seen below, I have also used a permit node and grade node to highlight the area that I am tracking.
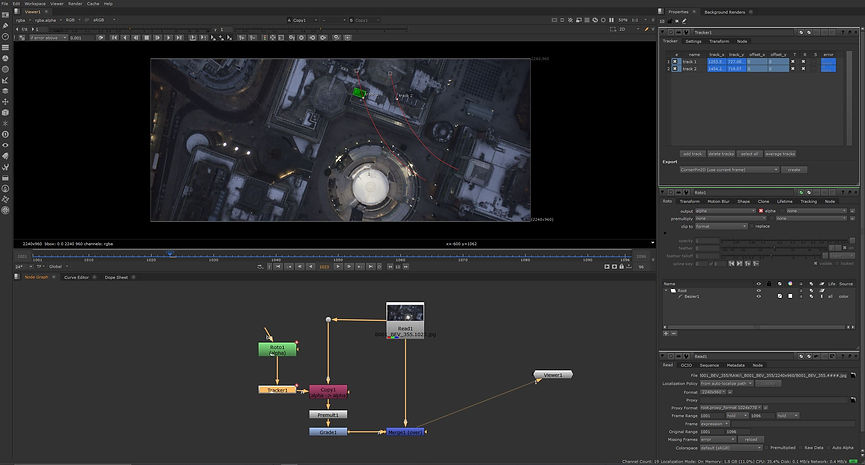
Final Result
Method 3

Above I have created a track of a moving car in the image sequence above. I have also created a rotoscope of the window at the front of the car, To make sure that the rotoscope stayed in place I had to key it in different times of the timeline.

Here is a screengrab to show the rotoscope in which I have also used a grade node and a premult to highlight the rotoscope.
Final Result
Week 7 - Josh Parks Nuke Masterclass

Refrence Image

Pre Blue Tint

Blue Tint
Final Result
Week 8 - Colour and Grading
In this week for the module, we had a look at colour and grading within nuke. This is something that I had a look at with Josh Parks in his masterclass in the previous week but this week I just focused on colour and grading. Below are the processes that I took:
Exercise 1

Above I have combined two images that I have previously used but as you can see the colour grading of the women and the background do not match, so this is something that I need to colour grade using the grade nodes.

Here is the view of the node view in which I have added multiple grade nodes so that I could fine-tune the colours of the women, Firstly I created a luma grade node in which I just adjusted the gain of the image. I also added a saturation node at the end to fine-tune.

Above I have created a roto node to highlight the sun on the woman arm as in the background that is where the sun is directing. I also added a grade node to the rotoscope in which I adjusted the gain to increase the exposure.

Final Result
Exercise 2

For this exercise, I had to match the colour and grade of the rotoscope of the floor. This was very similar to the steps that I took in the exercise above
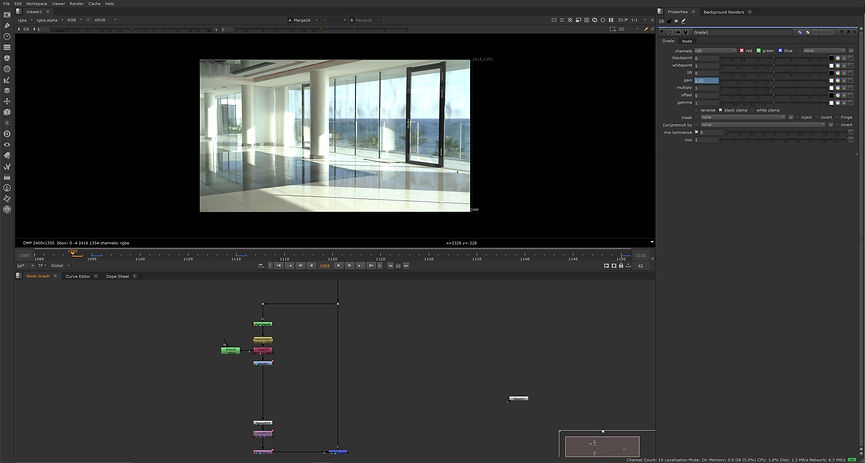
Above I have added a grade node to the rotoscope in which I just adjusted the gain of the rotoscope to make it blend in with the shadows of the floor. I also had to change the value of the gain when keying the image as the shadows changed during the video,

Here is an example of how you can adjust the grade node to change to the overall colour of the image.

Above is another example of how you can adjust the grade node to change just an area that I have rotoscoped
Exercise 3
For this exercise, I needed to colour grade the image below to match the reference Image

Reference Image

Pre Colour Grading

Final Result
Week 9: Cleanup and Patch repair
In this week for the module, we had a look at how to clean and patch repair an image or video in nuke. The workflow for the cleanup and patch repair was very similar to how I would do this in photoshop I found. Below ar my processs for this week.
Exercise 1

Above is a frame of a video that I will work. I will make sure the sticky tape on the green screen will be removed using the rotopaint tool in which I will use the marker tool to highlight and remove the sticky tape.

Above is the node view of the finished workflow. I used the tracker node to track each sticky tape in which I then used the rotopaint node to paint around the sticky tape in which I also used the clone tool to replace the area in which I painted around.

Tracked Sticky Tape

Finished Clean Up
Finished Clean Up
Exercise 2

Above is a shot from a video in which I will be cutting out the old man on the left of the image from the frames. I will use the rotoscope node and many others to perform this.

I first had to create a rotoscope on the old man and the general area around it in which I will then cut this out and replace it with the same area but from another frame within the sequence.

Above is the finshed node view from the cutting out of the old man from the video. I used the multiply node to make sure that when the two girls walk past the rotoscope they don't get removed with the old man, so to fix this I set the multiply node to 1 for when they walk past.
Finished Cleanup
Week 10: Complex Cleanup
In this his week for the module, we had another look at cleanups in Nuke but in this week we did more complex cleanups such as removing lots of people rather than just one. Below are my processes for this week.
Exercise 1

Above is a frame from a sequence of shots that I will be working with in the first exercise which is to cut out all the people in the crowd at the bottom left hand side of the image and match the tiles on the floor using the roto paint node as used in the previous week,
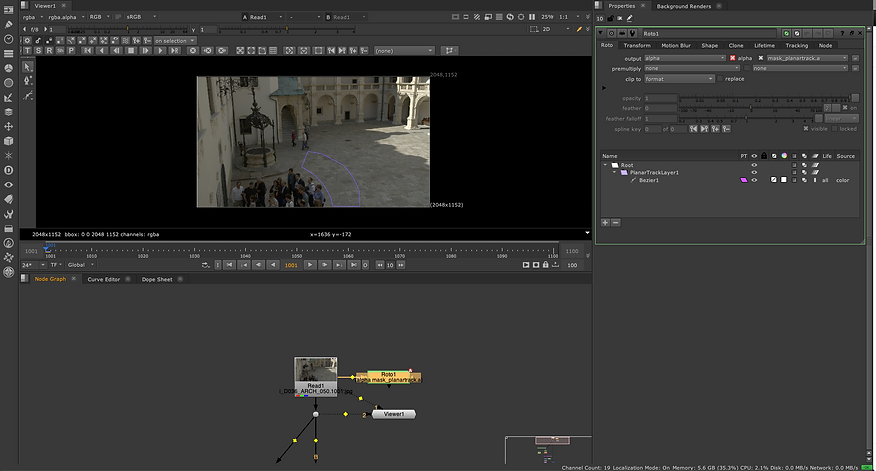
First I had to create a rotoscope of the area beside the people in which I then also created a planar track of that rotoscope to record the movement of that rotoscope.

Then I created the patch of the crowd of people using the nodes that are in the Patch backdrop seen above. I used the frame hold node again to make sure that I could work with the correct hero frame.

Once the patch work was done I then needed to bring back the shadows and darkness to the original area as this was removed when I used the patch tool. To bring this back I rotoscoped the area and then used the grade node in which I just adjusted the gain.

Node Graph View

Finished Cleanup (Frame 1001)
Exercise 2

Above is a frame from a video in which I will be removing the boat on the left handside from it using some of the same techniques that I have used above in previous exercises.

Above again I have created a planar track of the video so I record the movement of that rotoscope as seen in the previous exercise.

Here I have created my first patch on which I placed it at the front of the boat as seen above. For the boat to completely disappear I will need to place multiple of these in the area of the boat and also the rope that is going across to the rock.

Node Graph View
Finished Cleanup
In this week for the module, we had a recap of all the important techniques that we have learnt over the module in preparation for our assessment which is due in January. Below are the exercises that I completed for this week.
Exercise 1

In the first exercise, I needed to remove the "Mex Post" as seen above on the cardboard box. This is something that I have done in a previous week.


Node Graph View
Finished Result
Exercise 2

In the second exercise, I needed to remove the greenscreen from the lady in the shot above by using the techniques that I have learnt in the previous weeks.

Node Graph View

Finished Result
For the only assignment of this module, I had to recreate a QuickTime video that was given to me and also use the video sequence that was also given to me. The techniques that I will be using to recreate the QuickTime video in nuke will be those that I have learned in the previous weeks. Below are the steps that I took to recreate the video.

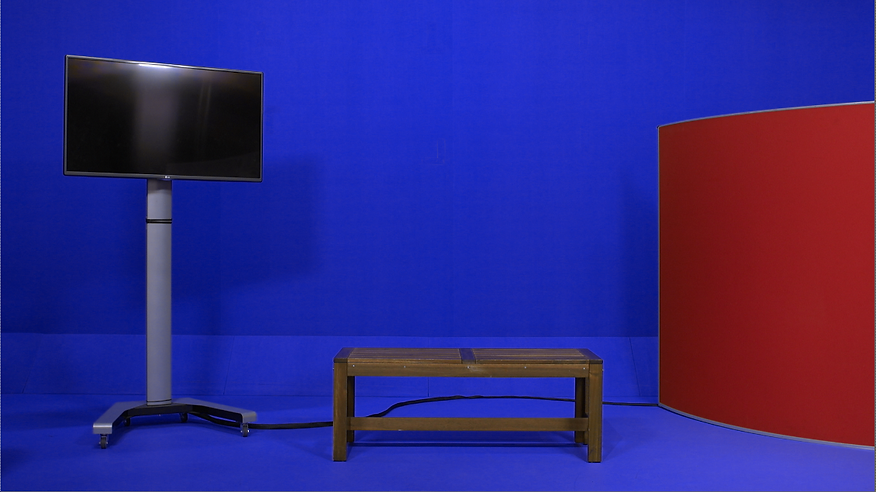
Base Image
Marker Removal
The first thing I needed to do to the video was to remove the pink markers on the green screen in the background. To do this I will use the roto paint node and also the frame hold as seen above in previous weeks.

Node Graph View

Finished Marker Removal
Keying
The next thing to do was the change the color of the greenscreen to a dark blue and to do this I used the key light node to key the background and then merge that with a constant that was a dark blue color. I also used another keylight node in which I changed the green rgb value to 1 to hide the despill.

Node Graph View
Finished Keying
Logo Removal
Next, I needed to remove the Logo from the briefcase and to do that I needed to use the roto paint node again and also the frame hold node as seen when removing the markers but I also had to track the briefcases movement and to do that I used the tracker node and then applied it to a cornerpin2d. I also had to make sure that the removed area was blended in with the rest of the briefcase and to do that I used a grade node in which I keyed it at various places along the timeline.

Node Graph View

Finished Logo Removal
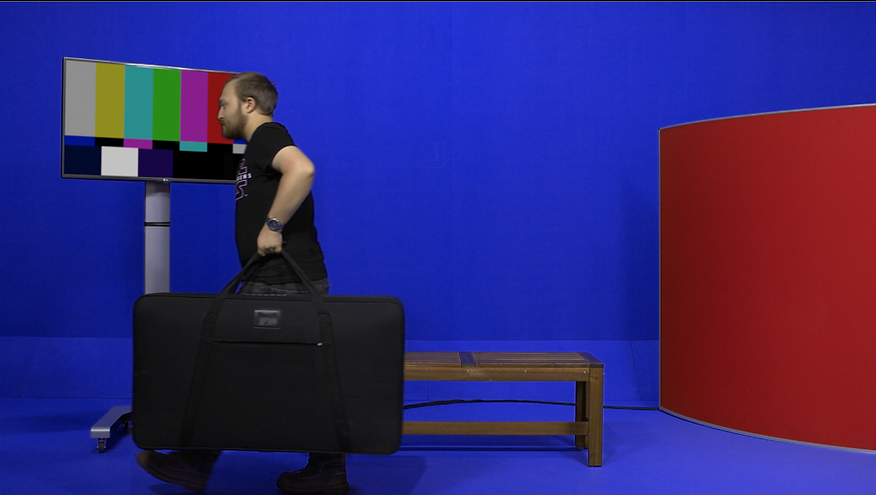
Adding Color Bars to TV
The final task that I needed to do was the add a color bar node to the tv. All I did for that was to add a color bar node and then used a corner pin 2d node to line it up. The main issue however was when the man walked past the monitor since the color bars were placed on top of the TV and wasn't originally in the scene that meant that the man was walking behind the color bars. To solve this I had to rotoscope around the head when he waked past the TV.

Node Graph View
Finished Color Bars
Reference Video
Final Result
For part two of assessment 1, I need to take the comp that I have made in Nuke above but change all of it to my own creativity rather than making it to the specified reference video. Below are the steps that I have taken to create my own shot of the video that I was given.
Final Result