Week 1- Introduction to 3D Animation, the bouncing ball
In this first week of the module I have been introduced the basics of 3D animation in Maya. I have be shown how to setup a scene for animation, key-framing, using the graph editor and also how to make a bouncing ball using all of those tools. Below is the steps I took to make a ball bounce in Maya.

Graph Editor For Bouncing Ball
Above is the graph editor of the bouncing ball, as you can see there is a clear curve indicating the motion of the ball as it goes into the free fall and then the bounce back upwards. Below is also a another view of the graph editor but for the squishing motion as it hits the ground.

Graph Editor For When The Ball Squishes.
Below are the most important keyframes that I used to create the bouncy ball. I used 30 frames and inserted some extra key frames within those to make sure that the ball is not being deformed before it hits the ground.

Key Frame 1

Key Frame 15
Key Frame 30
Once I added all the keyframes I then used the play bast to play my animation and below is the final result in 30 frames per second.
Bouncing Ball
Week 2 -The Obstacle Course
In this week of this module, we went back to where we left off last week with the introduction of a 3D animation of an bouncing ball. However, this week I got introduced to how to create arcs with the animation, and below are the results.

Graph Editor For Arcs
Above is the graph editor for the translate Y which Is used to create the arcs. As seen in the graph, the motion of the ball is seen with the arcs. I used the weighted tangent tool to perfectly adjust the angles of when the ball hits the ground.
Bouncing Ball Arcs
Ultimate Ball Rig

Above is a ball rig that has different points that you can move to only affect the desired area. This is a much easier and also smoother way of creating animations.
Ball Rig
Week 3 - Lattice deformer, ‘Sack of flour’ and Arm Rig
In this week we got reintroduced to basic hierarchy organisations with the use of parents and children when creating the arm rig. We focused on two tasks, one is the arm rig and the other is animating a sack of flour. Below are my processes.

Firstly I created a simple arm and hand using cubes in which I also transformed some parts to make it more real. I created a group out of all of these parts above to make it simpler in the hierarchy.

Group in Hierarchy

I then simply just mirrored the arm and also created a torso and head using standard cubes. Once all of the parts were together I set my hierarchy to look as below.

Hierarchy View
I then animated the arm and body as seen above by inserting key frames at frame 35 and also frame 0. By parenting and making the objects a child made it much easier to animate.
Sack of Flour Task

Above I have imported a simple sack of flour rig, which includes multiple point constraints which make the object easier to animate and move as it only focuses on the area of that interest. Below I have started to animate the sack of flour.
Basic Sack of Flour Animation
Week 4 - Inverse Kinematics | Animation Output
For this week for this module, we got introduced to inverse kinematics and how to implement it into the module that we created in week 3. Inverse kinematics is what is used to animate usually in Maya. Below is the processes that I took for this week.

Firstly, I added legs to the cubed man so he could have all his body parts for when I add joints to him using the create joints option in the skeleton section under rigging.
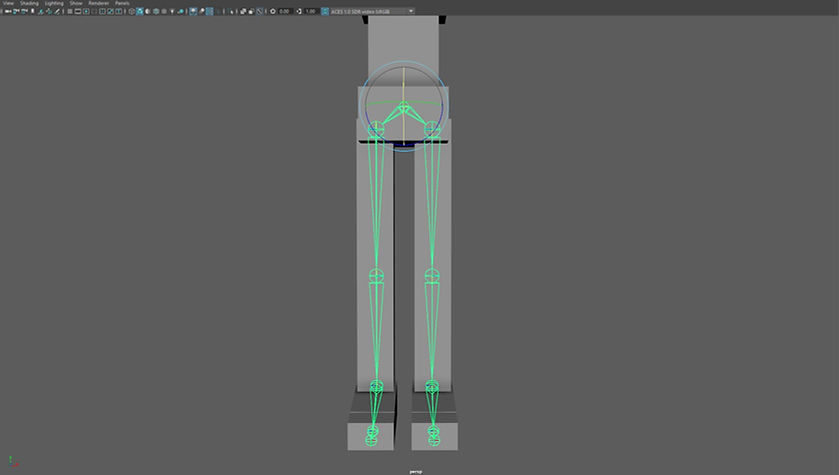
Above I have created joints to the legs and also the hips using the create joints option under the rigging section. Below is what the create joints look like in the menu,

Creating Joints

Next, I created two IK handles for where the joints connect to each other, this is to allow the joints to simulate what happens when one moves but the other does not. Below is a video showing the result.
IK Handle Movement

I then continued to create more joints for the rest of the man but for the arms I just create one side then I used the mirror special tool to duplicate it to other other side,

Lastly, I created some handles for the man in each of his important points such as the waist, head, arms and also stomach. The handles make it easier to animate the model. Below is an example of the man moving using the handles,
Circular Handles Example
Week 5 - Posing and ‘Head turn’
In this week we had a look at how to properly animate the character that I have made in weeks 3 and 4, fo I made a simple ball that the character will pick up using various methods.

Above I have set up the character to have a believable stance before he picks up the ball that I have place below him, I also had to fix the rigging since it did not seem to work as intended.
Next, I created a simple animation of the character leaning down to get the ball which was done with simple keying as seen above.
Then I added some extra movement in the character such as the head tilt seen above and also added some extra movement to the hands and fingers.
Above I have then added a pickup animation in which to do this I just created another key where I just reset the positions of the animations to original positions.
Before the final result, I also added a couple more refinements to the character as seen with the knees of the character which was done by creating a controller for the pole vector of the character. I then also added some points for the ball and the hand for when it connects.
Finally with the final result above I finished connecting the points to the hand and the ball in which it allows them to work as intended, I also added a sway movement in at the beginning.
For the first assignment for this module I was tasked with creating a bouncing ball in any way I saw fit, so for my assignment, I wanted to incorporate the bouncing ball in an obstacle course that I have made from scratch. Below is my final result:
Final Result
Week 6: Walk
In this week for the module we had a look at how to animate a simple walk in Maya, this is something that I have sort of done already with the animation of the sack of flour in the previous week but this time its all about creating a realistic looking animation of a person moving,

Above is an image of a reference for a walking animation. This is what most animators in the industry will use to calculate their walking animations. I have also used something similar for mine.

The image above is the rig that I will be using to animate my walking animation. The rig is fully customisable as I can change all sorts, like the hair, the eyes etc.

Firstly I had to create the first key for the animation as seen above I have set one foot forward and the other back.

For the next keyframe, I chose to go in small increments and I chose frame 7 as seen above. I also added a blinking animation in which I just adjusted the eyelid options in the attribute editor.

For the final keyframe, I just repeated the first keyframe but changed the footing around and also added some animation of the arms which is also seen in the previous keyframes.
Final Result
In this week of the module, we had a look at how to animate lifting weights. In week 5 we had a looking at a basic lift animation with my box character but this week we will use the rig in week 6 where we made a simple walking animation. will use Below are my processes for this week.

The image shows the weight that the character rig is going to pick up. Everything about the character rig above is the same as previous weeks but to allow the rig to pick up the weight the use of locaters is needed as seen below.

Locaters (Green Pluses)
Final Playbast
In this week of the module, we combined both weeks 8 and 9 together in one lecture since we have missed some lectures in the previous weeks. Below are my processes for this week.
Above is a video from 'Vox' explaining the early techniques of animation and the introduction of rotoscoping within animations. Rotoscoping is a technique that animators use to trace over motion picture footage, frame by frame, to produce realistic action.
Above is a video from youtube of a box lift reference video. I intend to use this video reference above to help animate a box lift animation in Maya. Before I can get this animation reference into Maya I must first chop it down in after effects.
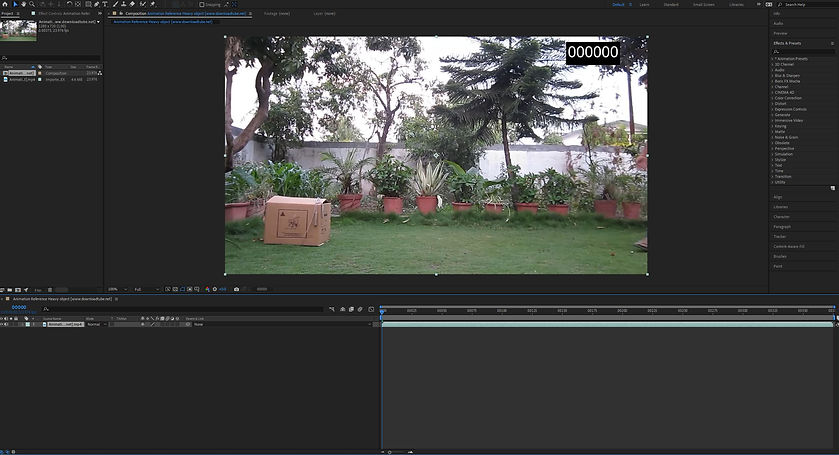
First I needed to import the video clip into after effects as seen above and also set the comp settings to make sure its the right resolution and video duration.

I then added the video to the render queue in which I made sure the output module was set to Lossless and also changed the format to Targa Sequence as seen below.

Format Change to Targa Sequence

Once in Maya, I need to create an image plane as seen above as this is the object that my reference video will be place on.

To get the reference animation onto the plane I had to set the colour of the image plane to use a file node and read the files that I have created using after effects. I also had to set the 'use image sequence' to on.
In this week for character animation, we had a brief look at what we need to do for our assessment 3 that is coming up and also had a look at cameras and animatics in Maya. We also had a brief look at how to import audio into our Maya scenes. Below are my processes taken for this week.
Adding Audio into Maya
We first had a look at how to add audio into Maya to help with our upcoming assessment 3, here is a hyper link that will take you to Maya help page for audio: Audio in Maya

Above I have imported an audio file into Maya following the steps in the guide above.

Audio Attribute Editor
Focal Length in Maya
We then had a look at the focal length settings in Maya, the focal length is best described as the angle of view when looking through a camera but it is explained in more detail here: Focal Length

Above you can see a camera and its attribute editor open on the right-hand side in which the focal length is something that you can adjust via the slider and also the options for the camera.
Depth of Field in Maya
A cameras depth of field is another factor that needs to be remembered when creating an animation as a depth of field is the distance between the nearest and the farthest objects that are in acceptably sharp focus in an image, this is needed to create a sense of depth in an animation or video. A detailed Maya help page can be found here: Depth of Field
For the second assignment for this module, I was tasked with a character animation that showed lifting and also walking. For my assignment, I chose to use a reference video that we have used in previous weeks and work further with that video. Below are my processes
Final Result
For the final assignment of this module, I was tasked with creating an animation to an 11 second sound clip that I could create or find online. This final assignment incorporates all the basic principles of animation and will show off some of the more advanced topics, such as overlapping or secondary motion, force and mass changes, acting and character development. Below are the steps I took to get to the final playbast and the playblast itself.

Above I have used the 11-second rig again as seen in previous assignments as this rig works perfectly for what I would like to do for this assignment. I have also imported an 11-second audio clip in which I will use for this assignment. As seen above I have also set up the first frame for the animation.

Throughout the 270 frames that I needed to animate I animated multiple points of the rig as seen above, I have animated the hand, the eyes and also the head. I found that it was particularly hard sometimes to get the timings right with the speed of the movmements.

Once the animation was done I then needed to set up the scene for when I needed to render it. I decided that I wanted to use the playblast feature rather than render each frame since I came into some problems with the audio when compiling the rendered shots with the audio. I also had to make sure that the playblast was at its best quality so I adjusted the viewer settings to allow the use of anti aliasing and change the shadow quality.
Above is a playblast without all the lighting and shadows and below is the final outcome with all the lighting and shadows added. To add these I used an ambient light and also a spot light.
Final Result