Week 1 - Intro to VFX Toolbox
In my first week for VFX Toolbox I got introduced to what I will be doing this semester in this module. We had a look at different film/TV show intros and how it plays a role in telling a story to what its describing and also how some of it was made.
As seen with the Game of Thrones intro, it portrays the entire universe of Westeros and also shows how the TV show is always changing in the way it shows the different cogs consistently moving. A good intro should be able to show what the story entitles in the movie/TV show they are showing and also entice the viewer to want to know more after seeing the intro in my opinion. We also discussed more intros and another one that I personally like was the West World TV show intro as seen below:
Week 2 - Introduction to After Effects
In this week I got introduced to the basics of After Effects and how to navigate its interface. We looked at how to move a an image by changing its position, rotation and scale below is the simple animation that I have created:
I then got taught more advanced animation techniques by creating an animation using different shapes that are stored in After Effects. I created different animations and then created a final animation as seen below:
Week 3 - After Effects Masks and Alphas
This week in VFX Toolbox I got introduced to after effects masks and alphas. People in the VFX industry can be assigned the task of rotoscoping a image which involves the process of cropping a images background out and only leave for example a head. Below I have experimented cutting out The Rocks head:

Above I have used the pen tool to cut around his face and use use the RotoBezier mode which auto smooths out the edges.
Above I have used a track matte on the the rocks face that I have already cut out and also combining it with a skull png that I have on my computer to create the effect above. I have also imported a animated fire to add it to the background.
For the second task we had to make our own adaptation of the intro sequence from the TV series true detective as seen below:
Week 4 - Introduction to Nuke
This week in VFX Toolbox I got introduced to the software Nuke, which is similar to After Effects but in Nuke it is more in depth and you can perform more precise operations that you cant do in After Effects. Below are my screenshots showing what I did:

Week 5 - Nuke Compositing 3D Renders
This week in VFX Toolbox we used Nuke again for composting 3D renders which was imported into Nuke that was made using Maya. I got taught about how you can break down a render into all the different parts such as the diffuse, specular and also depth. Below are some screen grabs of what I did:

Week 6 - Introduction To Animation In Maya
This week in VFX Toolbox we got introduced to the basics of how to animate something in Maya. This concept is very similar to other software including after effects. Below are my process to make a ball move.

Above are the key frames that I have added to make the ball look realistic as I have used rotation and movement on the Y and Z axis.

Above I have enable the ghosting that helps visualize the animation of the ball. The ghost view is very helpful to see the projectile of the object.
Once all of the setting up of the animation was complete the final result is above.
Week 8 - Introduction To Mash
This week in VFX Toolbox we got introduced to mash in Maya. Mash is a very fun tool inside Maya that can be used to generate different-looking objects by adjusting some modifiers without manually modifying the object.

Above I have applied a MASH to a standard cube and the results are that it was duplicated the cube in a line as seen above.

Above I have changed the settings in distribute section of the MASH tab. I have changed the scale of the cubes and also changed the rotation of them to create the spiral effect as seen above.

MASH Nodes

Distribute MASH Tab

Above I have experimented with the voxel settings in the MASH distribute area and I have linked the cubes to a spherical mesh to create the voxel sphere above.
Week 9 - More Mash
Today in VFX Toolbox we looked more into Mash and the different nodes that I have not looked at yet. We had a look at the curve node, orient node, dynamics node, trails node, offset node, caching and rendering colour with Arnold.

Above I have created a 2d circle which I then connected it to a curve node with a cube that looks like a dart. I have also added a colour node as seen above.

I then added a distribute and random node as this adds variation to the darts and makes it look more interesting.

Finally, I added an orient node which changes the direction in which the object faces, as this makes the darts look more alive rather than them moving verticaly.
Above is the final animation of the darts.

Above I have used dynamics, random and colour node to create the variant of objects seen above. I used the dynamics mode to make to objects fall and have ragdoll physics below is the video of the animation.

Above I have created this array of objects by again using the random and colour node as I will use the trails node and by having the random and colour node it helps with the variations.
Week 10 - Lights Cameras Rendering
In this week for VFX Toolbox, We had a quick introduction to how sounds work on After Effects and then moved onto different light renders in Maya, and also we had a look at how to make a realistic globe with a texture on it.

Above I have used the standard camera that is in Maya in which I have added the trajectories which helps line up the camera to what the subject matter is. You can also enter the camera view and see how it lines up that way. Below are examples of different light renders.

Here I have used the ambient light and point light to the scene above and I have also changed the ambient light colour to the brown colour seen above. I have also changed the intensity of the shadows and the point light.

For the next render light, I have used the spot light as this light acts like a bed lamp. Above I have also changed the position of the spot light to make it have more of an impact on the shadows.

Above I have used an area light and this creates the effect of something like a theatre stage. I have also changed the settings again with the height of the light and also the shadow intensity as seen above.

For the final light render I have used the volume light as seen above. Again I have also changed some of the settings around such as the position of the light and also the intensity of the light.

Above I have created a sphere in which I have imported a 4k texture of the earth that I placed on the sphere. Below is the final render of the earth in which I have also used a spot light to create the render below.

Week 11 - 3D In After Effects
In this week for VFX Toolbox, We went back into After Effects to have a look at the 3D space that after effects now has. These images are still 2D, even though there are in a 3D space as it creates the illusion of 3D by having the 3D space. Below are the steps that I took in experimenting with 3D space.

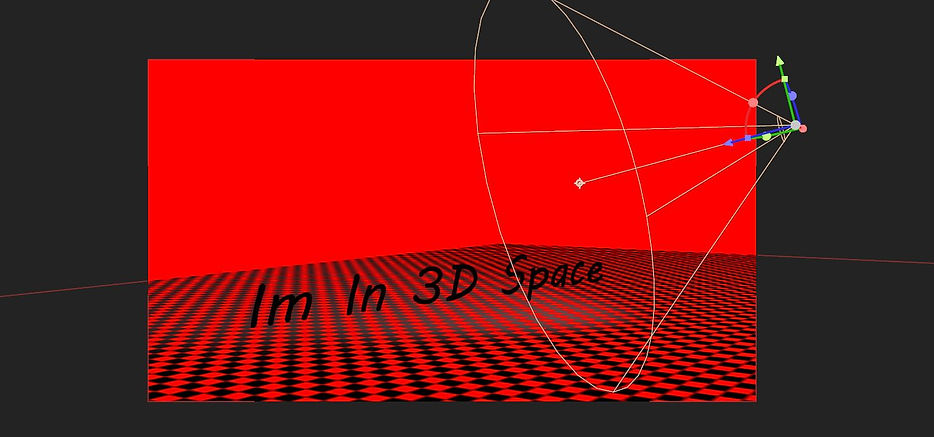
Above I have made a white solid and also a black solid to act as the foreground and the background and I have also created text as seen above with the "Im In 3D Space" as this is to show how the 3D space works as seen above.

The image above shows the different camera views that you can look at in the 3d space. After Effects allows you to expand these different camera views and work in that way whilst also working as seen above with all four camera views showing.

Above I have added a spotlight to the 3d Space as this creates shadows to enhance the use of the 3d space, I have also changed the rotation and intensity of the spotlight to make sure that the shadows were where I wanted them to be.
The image above is the final result of working in 3D space as I have also changed the black solid into a sort of checkers pattern to make the image look more interesting, I have also adjusted the spotlight a bit to make it less intense.
For assignment 2 which is the final assignment for this module, I had to make a title sequence that is 60 seconds long and also in the frame rate of 25 frames per second. I initially came up with the idea of creating something that had lots of different illusions in it to make it a very distorted intro scene, however, the results that I got from it did not turn out how I intended it to be. I then came up with the idea of continuing with the true detective theme that I have previously worked on in the previous weeks.
Above is the previous example of the true detective intro sequence and below is my final outcome for the title sequence.